How Do You Measure A Wick For A Jar?
A candle wick is a vital component of jar candles. It is the string that sits inside the wax and absorbs liquid wax through capillary action, helping fuel the flame of the candle. The wick brings the melted wax to the flame so it can continuously burn. Without a properly sized wick, a candle will not burn correctly.
Choosing the right thickness and type of wick is crucial for candles to burn properly and safely. The wick must be wide enough to absorb an adequate amount of wax, but not so wide that it drowns the flame. Properly wicking a candle ensures efficient wax pooling, a strong fragrance throw, and a flame that is not too big or small.
This article will explain the steps involved in measuring and cutting a wick specifically for a jar candle. Properly sizing and installing the wick will allow the candle to burn evenly from edge to edge and have a nice wax pool when lit.
Gather Materials
The materials needed to measure and prepare a wick for a jar candle include:
- Wick – You’ll need enough wick to go across the diameter of the jar, plus extra for testing and adjusting. Popular wick materials include cotton, paper, and wood (Choosing the Right Type of Wick and Wick Size).
- Ruler or measuring tape – You’ll need this to measure the diameter of the jar opening to calculate the wick length.
- Scissors – Used to cut the wick to size.
- Jar – The empty candle jar you’ll be putting the finished candle into. Have this on hand to measure.
Gather these basic supplies before starting the wick preparation process. Having the right materials will make measuring and cutting a properly sized wick easier.
Prepare the Wick
Before measuring and cutting the wick, it’s important to make sure the wick is prepared properly. This involves untangling the wick and laying it flat. An untangled wick will burn more evenly, and a flat wick will allow for accurate measuring.
To untangle the wick, gently separate any knots or kinks using your fingers. Be careful not to stretch or damage the fibers. Once the wick is untangled, lay it on a flat surface and smooth it out. Use your fingers or a wick straightener tool to remove any remaining curves or bends. The wick should lay perfectly flat with no twists or folds.
It can be helpful to place a small weight like a book on one end of the wick while preparing it. This will keep it from curling back up while you work. Just be cautious not to actually stretch the wick fibers. With the wick untangled and flattened out, it’s ready to be accurately measured and cut for the specific candle jar.
Measure the Jar
The next step is to accurately measure the jar that you plan to use for your candle. You’ll need to measure both the diameter and height of the jar in order to calculate the proper wick size.
To measure the diameter, use a ruler or measuring tape to measure across the widest part of the jar opening. This is the maximum width that the melted wax will need to traverse when being poured into the container. According to the Candle Jars FAQ, some jars may have a smaller mouth or opening than the widest part of the jar, so be sure to find the maximum diameter.
For the height, simply measure from the bottom of the inside of the jar up to the top opening. This will give you the total height that the wax will need to fill when making the candle.
Having accurate diameter and height measurements is crucial for selecting the proper wick size and amount of wax. A wick that is too small may tunnel or drown, while one too large can produce excessive smoke or a flickering flame. With the jar dimensions in hand, you’ll be ready to calculate how much wick and wax is required.
Calculate Wick Size
To calculate the proper wick size for your candle jar, you’ll need to consider the diameter of the jar opening as well as the diameter of the jar itself. The general rule of thumb is that the wick should be approximately 1/3 the diameter of the jar opening.
For example, if your jar has an opening diameter of 3 inches, your wick should be around 1 inch in diameter. You can precisely calculate the wick diameter using this formula:
Wick Diameter = Jar Opening Diameter x 0.3
So for a 3 inch opening:
Wick Diameter = 3 x 0.3 = 0.9 inches
Rounding up, a 1 inch wick would be best.
For very large pillar candles, you may need a thicker wick to prevent tunneling. In that case, base the wick size on the diameter of the entire candle. A general guideline is to use a wick approximately 1/10th the full candle diameter.
You can also find wick sizing charts from reputable suppliers like CandleScience that recommend wicks based on specific jar diameters and wax types.
Cut the Wick
Once you have calculated the proper wick length, it’s time to cut the wick. The best tool to use is a wick trimmer, which allows you to snip the wick cleanly and evenly [1]. If you don’t have a wick trimmer, you can use a pair of sharp scissors [2]. Hold the scissors perpendicular to the wick and snip in a downward motion. Try to cut the wick evenly and avoid leaving ragged edges. Cut the wick down to the calculated length above the candle wax. It’s important not to cut the wick too short, as this can lead to poor wax pooling and tunneling.
Test the Wick
Once you have cut the wick to size, it’s crucial to do a test burn to ensure you have the proper wick height and width for your candle jar. According to How To Conduct a Basic Burn Test, you’ll want to conduct a complete burn test from the first lighting through to extinguishing the candle. Observe how the wax pool forms and note if there is any excessive smoking, tunneling, or mushrooming of the wax. The goal is to have an even wax pool without a wide variation in size from the first burn to the last.
Per How to Perform Candle Wick Testing, testing 3-5 candles with the same wax but different wick sizes is recommended. This allows you to directly compare how the width and type of wick impacts the burn. Take notes on each candle’s performance and select the optimal wick for your particular wax and jar. If needed, make small adjustments to the wick width and do another round of testing until the perfect wick size is achieved.
Adjusting the Wick
Once you have test burned the candle, you may find that the flame is too large, too small, or producing a lot of smoke and soot. This means the wick needs to be adjusted before selling or gifting the candle.
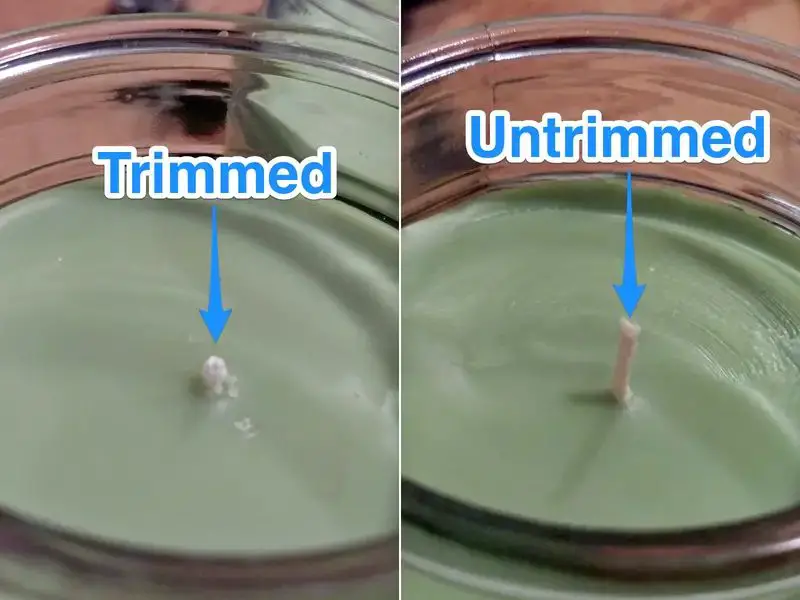
If the flame is too large and producing a lot of smoke, the wick is too wide for the wax pool. Carefully trim the wick by about 1/4″ and test burn again. Continue trimming and testing until the flame is a proper size with minimal smoke.[1]
If the flame is too small and getting drowned in wax, the wick is too small for the wax pool. Replace the wick with the next wider size and test again. A small flame means the wick cannot properly draw up enough wax fuel.[2]
Adjusting the wick requires patience and multiple test burns, but it is a critical step in achieving a clean burn. Do not sell or gift candles until the wick passes the test burn.
[1] https://www.candlescience.com/learning/candle-testing-test-burning/
[2] https://armatagecandlecompany.com/blog/ultimate-guide-how-to-choose-a-wick/
Best Practices
When measuring your wicks, follow these tips for the most accurate results and best candle performance:
Use a wick sizing chart from a reputable supplier like CandleScience or EcoSoya. Their charts provide recommendations based on wax type, vessel diameter, etc. Refer to the chart that matches your candle specifications. See: https://www.candlescience.com/learning/choosing-the-right-wick-size/
Measure the diameter across the top opening of the vessel, not around its widest point. The top opening size matters most.
For taper candles, calculate the wick size based on the taper’s base diameter, not the tip.
When in doubt between two wick sizes, choose the smaller size first for testing. You can always move up a size if needed.
Consider the wax type, fragrance load, and other additives when selecting a wick. These impact burn performance.
Always test burn your candles to observe flame height, melt pool, burn time, etc. Adjust the wick as needed based on actual burn results.
Maintain wick trimming at 1⁄4” to sustain even burning. Never leave wicks untrimmed.
Stick with reputable wick brands like CandleScience, EcoSoya, LX, CD, and HTP for best results.
Conclusion
In summary, properly measuring and selecting the right wick is crucial for candle making. The wick acts as the fuel pump, drawing wax up to the flame. To determine the ideal wick size, first measure the diameter of the jar and calculate the wick size based on wax type and jar size charts. Cut the wick to size, test it, and make adjustments as needed. With the right wick, your candle will burn evenly, safely, and efficiently.
Candle making allows for creative expression through fragrance, color, and design. But functionality must not be overlooked – a properly weighted and sized wick enables the candle to serve its purpose. Taking time to measure and test wicks will result in long-lasting, high quality candles. The satisfaction of a candle burning just right is worth the extra effort. With the guidance provided here, you now have the knowledge to make candles that will delight.