How Do You Double Boil Old Candles?
Double boiling candles is the process of re-melting old candle wax in order to create new candles. It involves placing the old candle wax in a double boiler, which uses steam from a pot of boiling water to gently melt the wax. This allows the wax to be reused to make new candles.
People may want to double boil old candles for a few reasons:
- To reduce waste – By reusing old candle wax, less wax ends up in landfills. Candle making is a craft that produces a lot of waste, with over 35 million candle containers ending up in landfills every year. Double boiling allows crafters to cut down on their environmental impact.
- To save money – Refashioning old candles into new ones is much cheaper than buying brand new supplies. It’s a cost-effective way to continue candle making.
- To refresh scents – The scent of an old candle can be revived by double boiling it and adding new fragrance oil.
- To repurpose containers – Pretty jars and tins can be given new life by melting down the old wax and replacing it with recycled wax.
Overall, double boiling is an eco-conscious craft that gives new purpose to used candle materials.
Gather Materials
Before beginning the candle making process, you’ll need to gather the necessary supplies. The main items you’ll need include:
- Double boiler – This provides a safe way to melt the candle wax gently at a lower temperature by using steam from boiling water. You can purchase a double boiler made specifically for candle making or improvise your own by using two pots (source).
- Spoon – Use a long handled spoon to stir the melting wax (source).
- Thermometer – You’ll need a thermometer to monitor the temperature of the melting wax so you know when to add the fragrance oil (source).
- Candle wax – This provides the base for the candle. You can use old candle stubs or purchase new wax (source).
- Fragrance oil – This provides scent. Make sure to use a fragrance oil designed specifically for candle making (source).
- Wick – This allows the melted wax to travel up and form the flame. Use a wick designed for the type of wax you are using (source).
Prepare the Double Boiler
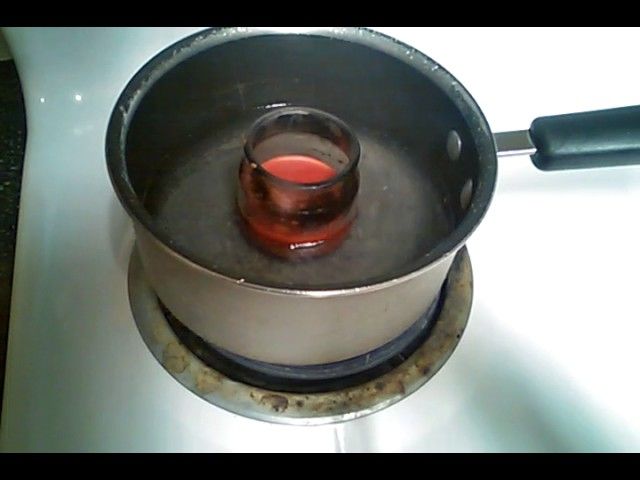
To make recycled candles safely, you’ll need to use a double boiler to melt the old candle wax. A double boiler consists of two pans – one nested inside the other. The bottom pan is filled with water and heated, while the top pan holds the wax and sits above the water.
Choose a pot for the bottom part of your double boiler setup. Fill it about halfway with water and place it on the stove over medium heat. The water should not be touching the bottom of the top pan when it is placed inside. Overheating wax can cause it to discolor, lose its scent, or even catch fire. Using a double boiler allows the wax to melt gradually and evenly.
For the top part of the double boiler, choose a metal or glass bowl that fits nicely inside the pot without touching the bottom. This will hold the old candle wax you want to re-melt. Avoid using plastic bowls as they may melt from the steam heat.
Once both pans are assembled, you have a safe double boiler setup ready for melting your old candle wax! Source
Add the Old Candle Wax
An important step is to properly prepare the old candle wax for melting. Start by breaking the candle wax into smaller, 1-2 inch pieces using a knife or your hands. This increases the surface area and allows the wax to melt faster. Place the broken up candle wax pieces into the top pan or a heat safe glass measuring cup. Then, set the pan or measuring cup into the bottom pan filled with water over medium-low heat on the stove. The water should not be boiling, just hot enough to slowly melt the wax. According to Martha Stewart, the wax only needs to reach a temperature of 150 to 160°F to melt properly. Stir occasionally as the wax melts. Melting over low heat helps preserve the integrity of the wax and avoids scorching it.
Check the Temperature
Once you’ve melted the old candle wax in the double boiler, it’s crucial to check that the temperature falls within the ideal range before moving to the next steps. According to experts, the wax should be heated to between 180-185°F initially to melt it thoroughly. However, before adding fragrance oils or pouring into containers, allow the wax to cool slightly to between 140-150°F. Going above 180°F runs the risk of burning the wax or losing some of the fragrance when you go to add it. On the other hand, dipping below 140°F may lead to improper mixing or clumping when pouring into containers. Using a thermometer, carefully monitor the temperature and adjust the heat as needed until the wax is within the ideal 140-150°F range for adding fragrance and pouring. This will ensure your recycled candles come out smooth, fragrant, and free from imperfections.
Add Fragrance Oil
Once the wax has fully melted, you can add fragrance oil if desired. When adding fragrance oil, it’s best to start with a small amount such as 1⁄2 teaspoon per pound of wax. You can always add more later if needed. The fragrance oil will disperse throughout the melted wax. Popular fragrances for homemade candles include floral, bakery, spicy, citrus, holiday scents, and essential oils. Let the wax cool slightly before adding the fragrance so it doesn’t evaporate.
According to LG Botanicals, you can use essential oils to add fragrance, but don’t add too much or the candle will be overly scented. It’s best to add drops of essential oil and test the fragrance before adding more. Every essential oil is different in strength.
Prepare the Wick
Once you have gathered your old candle wax and prepared your double boiler, the next step is to prepare the wick before pouring the melted wax into containers. Properly preparing the wick is an essential part of candle making, as the wick is responsible for holding the flame when the candle is lit.
To prepare the wick, first determine the size of the container you will be pouring the melted wax into. The wick must be cut to the appropriate length based on the diameter of the container so that it stands straight up when placed inside. As a general guideline, the wick should be approximately 1/4-1/2 inch taller than the container to ensure proper burning. Use scissors to carefully cut the wick to the needed size.
Next, secure the wick to the bottom of the container using hot glue or another adhesive. Make sure the wick is centered and straight. This will keep it taut and upright when the wax is poured in. The wick must be taut and centered for even burning. Now you are ready to pour the melted wax into the container!
For more details on preparing wicks, refer to this source:
https://www.pinterest.com/pin/how-to-prepare-wicks-for-candle-making–865817097096716304/
Pour into Containers
Once the melted wax has reached the proper temperature and you’ve added any desired fragrance oils or dye, you’re ready to pour the wax into containers to create new candles. This step requires care to avoid spills and properly set the wax. According to The Spruce Crafts, “Carefully pour the melted wax into the candle jar or other container, leaving room at the top for the wick and to allow for expansion as the wax cools” (source). Fill the containers most of the way full, leaving about 1/4-1/2 inch of space at the top. Try to pour gently in the center so the wax pools evenly. Allow the candles to fully set and harden before moving them.
Cool and Cure
Once you have poured the melted wax into the containers, it’s important to allow the candles to fully cool and cure before use. Proper cooling and curing is crucial for achieving optimal burn performance.
After pouring, let the candles sit undisturbed at room temperature for at least 24 hours. This allows the wax to completely solidify and shrink back from the sides of the container. According to Armatage Candle Company, “Candle curing describes the period of time from when a candle is poured to when it finally burns.” (https://armatagecandlecompany.com/blog/candle-curing/)
For best results, allow the candles to cure for 48 hours before lighting. Blaze and Foam notes that soy wax candles need 7-10 days to properly cure, while coconut wax candles require 10-14 days. The curing process allows the wax molecules to align and create a tighter hold. This helps the wax melt more evenly when burning. (https://blazeandfoam.com.au/blogs/blog/candle-curing)
Be patient during the curing process. Well-cured candles will burn cleaner and last longer. The extra wait is worth it for optimal performance.
Enjoy Your Recycled Candles
After all the steps are complete, you can now enjoy your homemade recycled candles! The whole process of melting down old wax, adding new fragrance, and pouring into containers allows you to give new life to used candles.
For best results, make sure to let the candles cure properly after pouring them. This means letting them sit for 24-48 hours before lighting to allow the wax to fully harden and stabilize. Proper wick length is also key – trim the wick to 1⁄4 inch before lighting to prevent excess smoking and ensure clean burns. Avoid drafts or excessive heat while curing.
Recycling old candle wax is a gratifying way to reduce waste while creating beautiful new candles. Not only are you repurposing what would otherwise be tossed, but you get to customize scents and vessels. Enjoy your handcrafted recycled candles knowing they burn cleanly and reduce environmental impact.
With some creativity and effort, those old stubs can be given fresh purpose. The ability to personalize the whole process makes it even more rewarding. Light one of your newly refreshed candles and enjoy the coziness!