Can You Use Any Silicone To Make A Mold?
Introduction
Silicone is a synthetic rubber material made up of polymers that can be shaped into molds for casting various materials. Silicone molds are commonly used to reproduce shapes and forms for a variety of purposes. Some key benefits of silicone molds include:
- Flexibility – silicone molds are flexible and elastic, allowing easy demolding of casted parts.
- Durability – silicone molds are tear resistant and can last through many casting cycles.
- Detail resolution – silicone can pick up very fine details from a pattern or model.
- Temperature resistance – silicone withstands temperatures from -100 to 500°F making it suitable for casting many materials.
Making a silicone mold involves selecting the right silicone, preparing a pattern, mixing and pouring the silicone over the pattern, allowing time to cure, and demolding to reveal an exact mold cavity. With some basic materials and techniques, silicone can be shaped into reusable molds for resin casting, metal casting, plastic injection molding, food applications, and more.
Types of Silicone
There are three main types of silicone that can be used for mold making: tin cure, platinum cure, and condensation cure. Each has its own advantages and disadvantages.
Tin cure silicone is the most commonly available and affordable option. It cures by a chemical reaction when the base and curing agent are mixed. Tin cure molds are relatively strong and rigid, with decent tear strength. However, they have a shorter shelf life of 6-12 months. An example is Mold Max from Smooth-On (https://www.smooth-on.com/products/mold-max-series/).
Platinum cure silicone offers superior strength and flexibility to tin cure materials. It also has a longer shelf life of 1-2 years. The drawbacks are a longer cure time and higher cost. A popular platinum silicone for mold making is Dragon Skin (https://www.smooth-on.com/products/dragon-skin/).
Condensation cure silicones are room temperature vulcanizing (RTV) materials that release acetic acid vapors as a byproduct during curing. They are easy to use and affordable. However, the vapors can be irritating and inhibit surface cure of cast resin pieces. An example is Oomoo 30 from Smooth-On (https://www.smooth-on.com/products/oomoo-30/).
Selecting the Right Silicone
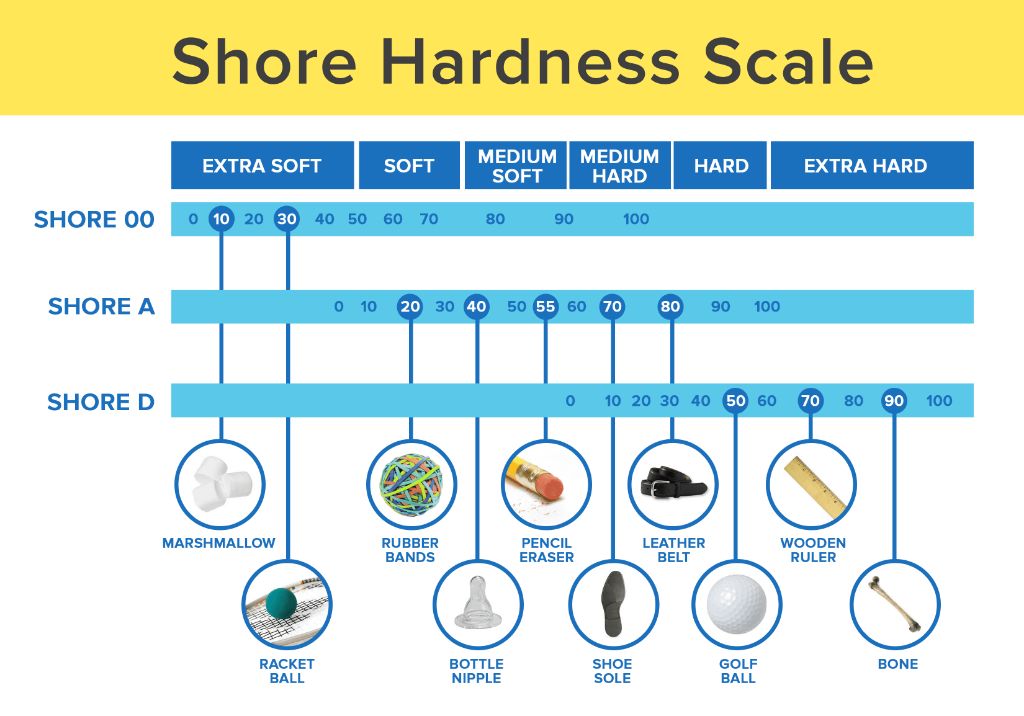
When selecting silicone for mold making, it’s important to consider the design of the mold and the material that will be cast into it. The shore hardness, cure time, and heat resistance of the silicone should match the requirements of the project.
For detailed molds that capture fine textures and details, a softer 10-20 shore A silicone is recommended, as it will flow into intricate spaces and pick up finer features. This softer silicone is also good for molds casting materials like resin, wax, and gypsum that do not require as much durability from the mold.
For molds casting hard materials like concrete, plastic, or metal, a firmer 30-40 shore A silicone is better. The harder silicone can withstand the pressure and hold up to repeated castings. An industrial grade 60 shore A can even be used for metal castings. The firmer silicones may miss picking up very fine details.
Standard cure silicones that fully set up in 4-8 hours are sufficient for most applications. For quick demolding, a fast cure silicone that sets in 10-30 minutes can be used. If more working time is needed for large or intricate molds, a longer 8-24 hour cure silicone allows more time for pouring.
Lastly, the silicone needs to withstand the temperature of the casting material and curing/setting process. High heat resistance is required for any casting using materials over 200°F. Platinum cure silicones offer the most heat resistance up to over 500°F.
Choosing the silicone formulation optimal for the specific project will result in the best quality, longest lasting molds. Consulting manufacturer technical guides can help match the ideal silicone to your mold design and casting material. (https://www.siliconetop.com/solutions/how_to_choose_silicone_hardness.html)
Preparing the Original
When making a silicone mold, properly preparing the original object is crucial for getting a clean cast. The original should be thoroughly cleaned and free of any dirt, dust or oils. According to How to Make A Silicone Mold, the surface should be lightly sanded to improve silicone adhesion. Use a release agent like petroleum jelly or mold release spray to coat the original; this prevents the silicone from sticking and enables easy demolding.
It’s also important to avoid undercuts when designing originals for silicone molds. Undercuts are protruding parts that would lock the original inside the mold. As How to Make Silicone Molds: A Practical Guide explains, undercuts should be eliminated or you won’t be able to remove the original from the mold without distorting or tearing the silicone.
Mixing the Silicone
Properly mixing the two parts of silicone is crucial for creating a durable mold. It’s important to carefully follow the manufacturer’s instructions for the mix ratio, usually a 1:1 or 10:1 ratio by volume or weight. Measuring out each part precisely according to the ratio is vital – inaccuracies can lead to uncured spots or a mold that cures too soft.
Thoroughly mix Part A and Part B together, using a mixing container and utensil designed for silicone. Mix vigorously for the time specified on the instructions, at least 3-5 minutes, making sure to scrape the sides and bottom of the container so no unmixed silicone remains. Mix too little and the silicone won’t cure properly. Overmixing can introduce excess air bubbles into the silicone. Mix at room temperature, as temperature affects the silicone’s viscosity and cure time.
Once properly measured and mixed, the silicone is ready to pour into the mold frame or original object to make an impression. Work quickly as some silicone rubbers set up fast with a short pot life. Vacuum degassing afterward is recommended for a bubble-free mold.
Source: https://www.smooth-on.com/support/faq/92/
Pouring the Mold
When pouring the liquid silicone into the mold frame, it’s important to avoid introducing air bubbles that could leave defects in the finished mold. Pour the silicone in a steady, low-velocity stream along the edges and let it gradually flow across the mold surface. Tilting the mold frame slightly can help the silicone cover all areas. Pour from a low height above the mold surface rather than dumping from higher up. Some silicone mold makers also recommend pouring in layers, waiting for each layer to settle before adding the next. This gives bubbles time to pop.
Using a mold box or frame is highly recommended, as it provides structure for the flexible silicone to cure in. The frame should be slightly larger than the master object, providing at least 1 inch of space around all sides. Apply mold release spray to the inside of the frame. Once poured, the silicone should completely fill the frame for best results. Check for air pockets or gaps in the corners and sides, adding more silicone as needed before the layer starts to cure.
Proper pouring technique is crucial for avoiding defects. Let the silicone gradually flow over all surfaces, while minimizing splashing and turbulence. With care and patience during pouring, you can produce a high quality flexible silicone mold.
Curing and Demolding
One of the most critical steps in working with silicone molds is allowing enough cure time before attempting to demold. Silicone requires full vulcanization to reach its maximum physical properties and demold cleanly. This curing process can take 24-48 hours at room temperature. Be patient and do not rush this step, or you risk tearing the mold or leaving uncured areas.
Once fully cured, carefully flex the silicone to break the seal before prying it open. Wiggling and bending helps separate the mold from the casting without ripping. Go slowly around the edges first. For complex molds, demold in sections to avoid excessive stretching or damage. Applying gentle pressure often releases the cured material. Some silicones also benefit from a light coating of corn starch or talcum powder before casting, which eases demolding.
Rushing the curing or demolding steps leads to premature failure. Allowing full vulcanization ensures clean releases and extends the mold’s usable life. With proper care, quality platinum-cure silicone molds can produce hundreds of detailed castings.
Using the Finished Mold
When you are ready to use your finished silicone mold, there are some important steps to ensure it lasts as long as possible:
Apply a thin layer of release agent to the inside of the mold before each use. This prevents materials like resin or chocolate from sticking. Use a release agent made specifically for silicone molds.
Carefully pour your casting material into the mold, trying to avoid air bubbles. Tap the mold gently on a hard surface to release any trapped air.
Once your resin, chocolate, or other material has fully cured and hardened, gently flex the mold to loosen the cast and pry it out carefully. Avoid using excessive force.
Clean your silicone mold gently after each use. Wash with mild soap and water, avoid abrasive scrubbing. Allow it to fully dry before storing.
Store silicone molds away from heat, sunlight, and moisture when not in use. Place them in resealable plastic bags or airtight containers. With proper care, your silicone mold can be reused many times.
Advantages of Silicone Molds
Silicone molds offer several key advantages that make them a popular choice for mold making across many industries:
They are extremely durable and reusable. The elasticity of silicone allows molds to flex and bend without breaking, so they can be used repeatedly to cast hundreds of parts. Silicone molds retain fine details and precision over time better than rigid molds.
Silicone molds are heat resistant up to approximately 500°F, making them suitable for casting candies, chocolates, baked goods, and other materials that require heat. They can also withstand freezing temperatures, allowing them to be used for ice cubes, gelatin desserts, and more. The flexibility of the material allows for easy release of cast parts.
Silicone molds are generally easy to use. The liquid silicone mixture can be readily poured over an original model and cured. Demolding cast parts is easy thanks to silicone’s flexibility. Minimal release agents are required compared to rigid mold materials. Clean up is also simple – cured silicone can be flexed to release leftover materials, then rinsed clean.
The composition of platinum-cure silicone allows molds to capture extremely fine details down to the micron level. This makes it possible to accurately reproduce textures, designs, and precision components.
Overall, the durability, flexibility, heat/cold resistance, ease of use, and precise replication offered by silicone make it an excellent material for mold making across many applications.
Sources:
https://www.gluegun.com/blogs/adhesive-reviews/silicone-mold-making-and-its-impact-across-industries
https://www.jbprince.com/web-pages/advantages-of-silicone-molds.asp
Conclusion
Silicone is a versatile material that can be used to make molds of many objects. However, not all silicones are created equal. It’s important to select a platinum-cure silicone that is designed specifically for mold making. This type of silicone will have the right balance of viscosity, tear strength, and flexibility. Prepare the original object properly by coating it in a release agent. Carefully follow the instructions for mixing and pouring the silicone, being sure to avoid bubbles. Allow the full curing time before demolding. The finished silicone mold can reproduce fine details and last through many castings. With the proper planning and techniques, homemade silicone molds can be an accessible DIY solution for replicating objects.
To summarize, best practices for silicone mold making include:
- Using platinum-cure silicone made for mold making
- Applying a release agent to the original object
- Precision mixing and pouring
- Letting the silicone fully cure before demolding
- Being extremely careful when handling and storing the finished mold
Following these guidelines will help ensure your homemade silicone molds come out cleanly and can be reused successfully.