How Do You Liquify Bar Soap?
Liquifying soap means converting a bar of soap into liquid form. There are several reasons you may want to liquify soap rather than use bar soap:
- Liquid soap is often gentler on skin than bar soap.
- It’s easier to dispense liquid soap, especially when washing hands.
- Custom scents and ingredients can be added to create personalized liquid soap.
- Liquid soap is convenient for refilling bottles and dispensers.
The process involves grating bar soap into flakes, melting it down with water, and then adding desired fragrances and compounds. Once cooled, the liquid soap can be bottled up and used just like commercial liquid hand or body soap. This guide will overview everything you need to know to turn bar soap into liquid soap yourself.
Ingredients
The main ingredients needed to liquify bar soap are:
- Bar soap – Any type of bar soap can be used, such as castile, glycerin, or handmade cold process soap. Common soap bases include olive oil, coconut oil, palm oil, shea butter, and sodium palmate (Liquid Soap Bases, Surfactants).
- Water – Distilled, filtered, or boiled and cooled tap water. The water hydrates the soap and creates the liquid form.
- Essential oils or fragrance (optional) – A few drops of essential oils, such as lavender, lemon, or tea tree, can provide aroma. Artificial fragrances also work.
Supplies
You will just need a few basic kitchen supplies to turn a bar of soap into liquid soap [1]:
- Grater or knife to grate the soap into small pieces
- Saucepan to heat the water and melted soap in
- Spatula to stir the mixture
- Funnel to pour the finished soap into bottles
- Bottles to store the finished liquid soap in
Make sure all equipment is clean before starting. You can use glass, stainless steel, or plastic equipment.
[1] https://www.goingzerowaste.com/blog/homemade-liquid-hand-soap/
Grate the Bar Soap
Use a grater or knife to finely grate the bar soap. Some soaps grate better than others. Fels-Naptha, Ivory, Castile, or Zote soaps tend to grate well into a fluffy powder. Other soaps like handmade or natural bars may be harder and better to cut into small pieces rather than grate according to sources like this Quora thread. Try freezing the bar for 30 minutes before grating if it’s on the softer side.
Aim to grate the soap into a light, fluffy powder. The finer the grating, the faster it will melt in the next steps. Use a rotary cheese grater, box grater, microplane, or the grating attachment on a food processor if you have one. Grating by hand with a knife takes longer but works as well. Grate in small batches to prevent clumping.
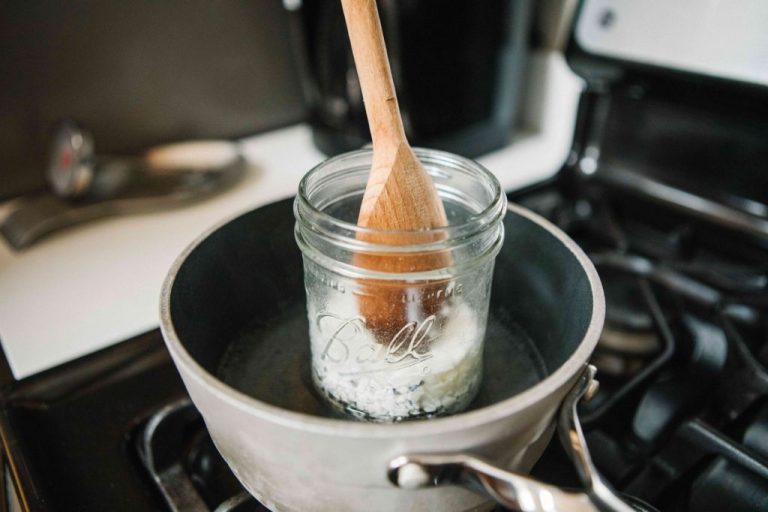
Add Water and Heat

Add the grated soap to a saucepan along with the water. The ratio of soap to water can vary, but a common starting point is 1/2 cup grated soap to 3 cups water (Going Zero Waste).
Heat the soap and water over medium heat, stirring frequently, until the soap has fully melted and the mixture is uniform. Make sure to stir often to prevent the soap from burning on the bottom of the pan. Continue heating and stirring until no soap bits remain.
The mixture will begin to thicken as the soap melts. Remove from heat once all of the soap has dissolved.
Cool and Add Fragrance
Once the grated soap and water mixture has melted completely, you’ll want to let it cool slightly before adding fragrance oils or essential oils. Letting it cool first helps prevent the fragrance from evaporating due to the heat. According to BrambleBerry, you’ll want the melted soap to be around 120-130 degrees F before adding fragrance.
When it comes to how much fragrance to add, a general guideline is 0.7 ounces per pound of soap for cold process soap according to BrambleBerry’s fragrance calculator. For liquid soap specifically, aim for about 1% essential oil, which equals 1 gram of oil per 100 grams of soap according to Fragrance Innovation.
You can use essential oils or fragrance oils in your liquid soap. Just make sure to add the fragrance after cooling the melted soap base. Mix thoroughly to fully incorporate.
Funnel into Bottles
Once your liquid soap mixture has reached the desired thickness after cooling, it is time to carefully funnel it into empty bottles for use. Make sure the bottles you choose are thoroughly cleaned and free of any residue from previous products. Some good options for liquid soap bottles include:
Recycled plastic bottles from old shampoo, hand soap, shower gel, etc. Thoroughly rinse and clean these bottles before reuse.
Plastic bottles designed for hand soap, lotion, or similar products. You can find inexpensive options at container stores.
Glass bottles with pumps also work well for a homemade, natural look. Try to find bottles with leak-proof lids.
Be sure to work slowly and carefully when funneling the liquid soap into the bottles to avoid spills and messes. Leave at least 1/4 inch of headspace at the top of each bottle. Wipe any drips from the outside of the bottles before curing.
Allow to Cure
Once the liquid soap has been poured into bottles, it is important to allow it to cure for 2-4 weeks before using it. This curing time allows for a process called saponification to fully complete.
Saponification is the chemical reaction between the lye and oils that occurs during soap making. When lye and oils mix together, they begin bonding on a molecular level to form soap. However, this reaction takes time to fully run its course. Allowing soap to cure gives the saponification process time to finish (Source: https://thethingswellmake.com/how-why-and-when-to-cure-soap/).
During the curing period, excess water evaporates from the soap, making the bar harder and improving lather. Curing also allows time for any excess lye to react, ensuring the soap is milder on skin. Once cured, the soap will be ready to use and enjoy.
Use and Storage
The liquid soap you make from grated bar soap can be used just like regular liquid hand soap or body wash. Apply a small amount to wet skin and work into a lather before rinsing clean. Be careful not to use too much, as liquid soap is quite concentrated compared to commercial body washes.
Properly stored, your homemade liquid soap should last 1-2 years (1). Keep it in an airtight bottle, away from excess heat and light. If the soap seems to become thinner or develop an odd odor or texture, it’s time to replace it. Don’t add more water to try to revive old soap, as this can throw off the preservative balance. Simply make a fresh batch and use within the shelf life.
One tip for extending shelf life is to store the soap in the refrigerator after making it. The cool temperature helps slow down the chemical reactions that can degrade the soap over time. Just be sure to allow the soap to return to room temperature before use for the best lather.
Customizing Your Soap
One of the best things about making your own liquid soap is that you can customize it however you want. Here are some ideas for adding your own personal touch:
Custom Scents
Add a few drops of essential oils like lavender, lemon, or tea tree to create your own signature scent. You can use individual oils or combine several complementary scents. Just be careful not to add too much fragrance, as it can irritate skin. A good rule of thumb is 1-2% of the total batch weight.
Colorants
Liquid soap is naturally opaque, but you can tint it any color you like with liquid soap dyes or even natural colorants like mica powder. Add color slowly and test on a small batch first to ensure you achieve the desired hue.
Texture
Some ingredients can alter the viscosity and feel of your liquid soap. Adding a touch of glycerin will create a thicker, creamier lather. Incorporating oils like jojoba, olive, or sweet almond will leave skin feeling extra moisturized.
Exfoliants
Consider adding gentle exfoliants like oatmeal, ground loofah, or fruit seeds to transform your liquid soap into a scrub. This helps buff away dull skin cells for a revitalized, glowing complexion.
The options are endless when making homemade liquid soap. Let your creativity run wild and have fun designing a custom formula perfect for you!