Can You Melt A Bar Of Soap And Remold?
This article will explain how to melt down a bar of soap and remold it into a new shape or form. Remolding soap involves melting unused soap scraps or old bars of soap and pouring the melted soap into molds to create new bars. There are a few reasons why someone may want to remold a bar of soap:
- To reuse old scraps of partially used soap bars and reduce waste
- To create a custom soap shape or design
- To change the color or scent of a bar of soap
- To create soap embeds like flowers or toys
With some simple steps, remolding soap at home is easy. This article will cover everything you need to know, from melting methods to mold preparations, troubleshooting, and creative ideas for your remolded soap.
Can You Melt Bar Soap?
Yes, bar soap can be melted. Bar soap is made from a mixture of oils and fats that have been combined with an alkali, usually lye. The process of saponification turns the oils and fats into soap, but the molecular composition remains oils and fats. Since oils and fats can be melted, so too can bar soap (source).
When bar soap solidifies, the fatty acid chains pack together tightly, creating a solid state. However, when heat is applied, the kinetic energy causes the molecules to move faster and spread apart. This allows the bar to transition from a solid to a liquid as it melts. Therefore, it is entirely possible to melt a bar of soap by heating it up.
How to Melt Bar Soap
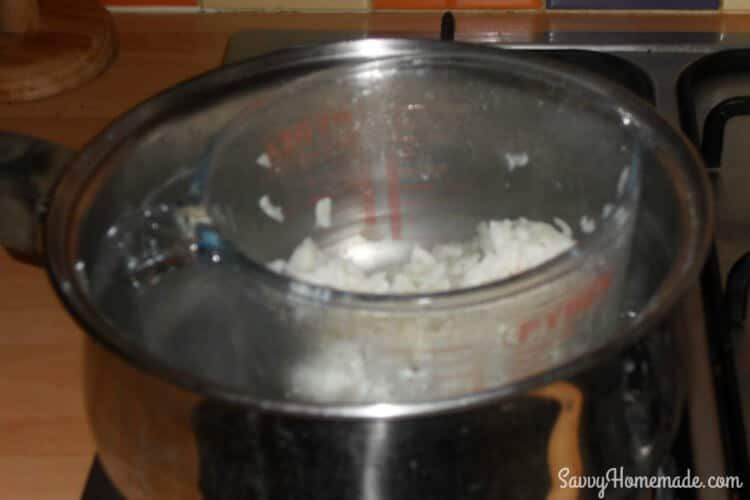
To melt bar soap, first grate or finely chop the soap into small pieces using a cheese grater or knife. This increases the surface area and allows the soap to melt more quickly and evenly. According to experts, it’s ideal to heat the soap slowly at a temperature between 105-120°F to avoid overheating it. There are a couple methods you can use to safely melt soap.
The double boiler method involves placing the grated soap in a heatproof container set over a pot of simmering water. This indirect heating gently melts the soap. Monitor the temperature with a thermometer and stir occasionally until fully melted. Take care not to let the water boil or touch the bottom of the top container.https://www.wikihow.com/Melt-a-Soap-Bar
You can also use a microwave to melt soap. Put the chopped soap in a microwave-safe container and microwave in short 10-15 second bursts, stirring in between. Go slowly to avoid overheating. Melting may take 1-2 minutes total. Covering with plastic wrap can help retain moisture. Allow the soap to cool slightly before handling.https://www.ehow.com/how_7313446_melt-soap-bar.html
Re-molding the Melted Soap
Once the soap has fully melted, the next step is to re-mold the liquefied soap into new bars or shapes. It’s important to prepare the molds while waiting for the soap to melt. Silicone molds, plastic containers, or even cardboard boxes lined with plastic wrap or wax paper work well for remolding melted soap. Avoid using materials like aluminum that can react with the soap.
According to WikiHow, pouring the melted soap into molds while it is still hot allows it to spread evenly on its own [1]. Carefully pour the liquid soap into the prepared molds, filling each cavity about halfway. Tap the molds gently on the counter to release any air bubbles. If desired, add dried flowers, essential oils, colors, or other add-ins to the molds before pouring in the soap.
After pouring, allow the soap molds to cool undisturbed for 12-48 hours. Do not move or unmold the soap until it has fully hardened and cooled. This ensures the soap holds its shape. Once hardened, gently remove the bars or shapes from the molds. At this point, the remolded soap is ready to use!
Tips for Remolding Success
When remolding soap, it’s important to work efficiently before the melted soap starts to harden again. Here are some tips to help ensure success:
First, make sure to have your molds prepared in advance. Lightly spray the molds with rubbing alcohol to help the hardened soap release easily. Allow the alcohol to fully evaporate before pouring in the melted soap.
Work quickly and purposefully once the soap has melted to its liquid state. The liquid soap will begin setting up again within minutes as it cools. You’ll want to have your molds, colors, and scents ready to go so you can work efficiently.
Don’t overheat the soap during the melting process. Heating the soap to too high of a temperature can scorch the oils and alter the properties of the soap. Use the lowest heat possible to fully melt the soap.
Finally, be sure to allow adequate time for the remolded soap to fully harden before attempting to remove it from the molds. This may take 24 hours or more depending on the size of the soap mold. Patience is key for a clean release.
Following these tips will help ensure your efforts with remolding soap will result in successful creations with an appealing look and feel.
Adding Colors and Scents
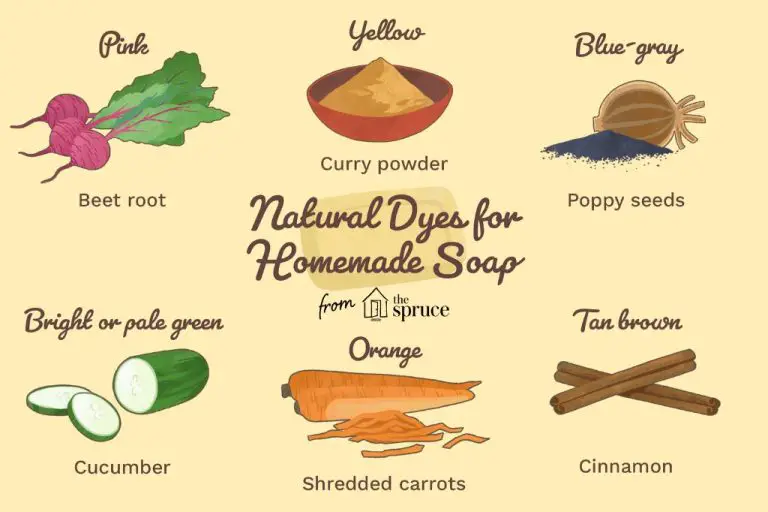
One of the great things about remolding soap is that you can customize the look and smell by adding liquid dyes and essential oils.
To add color, simply stir in a few drops of liquid dye after the soap has melted and before pouring it into the molds. You can experiment with mixing colors to create beautiful swirls or layers in your remolded soap bars. According to The Spruce Crafts, adding 0.5-1% of the soap’s weight in liquid dye will create a nice vivid color.
Essential oils can also be incorporated to provide a lovely scent to your remolded soap. As recommended by WikiHow, use 0.5-1% of the soap’s weight in essential oils. Be sure to use the same fragrance if you are mixing multiple soap scraps together, otherwise you may end up with an unfavorable blend of scents. The key is to add the essential oils after the saponification process is complete, right before pouring into molds.
With some creativity and the addition of colors and scents, you can give new life to old bars of soap through remolding.
Creative Ideas for Remolded Soap
Once you’ve mastered the basics of melting and remolding bar soap, you can get creative with colors, scents, shapes, and designs. Here are some fun ideas to try:
Layer colors for a swirl effect. Melt soaps of different colors separately, then pour layers into your mold one at a time. Use a skewer to “swirl” the colors together. The lighter colors will swirl up and through the darker ones. For best results, wait several hours between pouring layers so they have time to firm up.
Press decorative items into the surface. You can customize your homemade soaps by pressing seashells, dried flowers, coffee beans, oats, or other small items into the top layer. Make sure items are completely covered by the soap. Wait at least 6 hours before unmolding so decorations have time to adhere.
Create fun shapes like hearts or stars. Specialty silicone molds make it easy to shape your melted soap into hearts, stars, shells, or other novelty shapes. Make sure you grease the molds well so the soap releases easily. Let children help pour colored soap into shaped molds for homemade bath toys.
For more creative soap craft ideas, check out this guide from The Spruce Crafts.
Troubleshooting Issues
There are a few common issues that can occur when melting and remolding soap. Discoloration from overheating is one problem to look out for. This happens when the soap gets too hot, causing the ingredients and colors to darken or change hues. To avoid discoloration, melt the soap at a low temperature and stir frequently. According to The Nerdy Farm Wife, temperatures above 170°F can start to burn soap, so melt carefully on low heat (source).
Cracking is another problem that results from cooling the melted soap too quickly. To prevent cracking, pour the melted soap into the mold and allow it to cool slowly at room temperature. Do not put it in the refrigerator or freezer. Slow cooling over 8-12 hours allows time for the soap molecules to set up properly (source).
Finally, overmixing can lead to separation of the soap ingredients after remolding. Stir gently and mix only enough to fully incorporate any colors or additives. According to Crafter’s Choice, minimal mixing helps maintain the smooth, creamy texture (source). Allow the soap to cool and set up before unmolding to avoid separation issues.
Use Cases for Remolding Soap
There are several common reasons why you may want to melt and remold a bar of soap, including:
Salvaging old or damaged bars – Over time, bar soap can become cracked, broken, warped, dried out, or crumbly. Rather than throwing away old bars that are still usable, you can melt them down and give them new life in a freshly molded bar. This helps reduce waste and save money.
Creating custom shapes or sizes – Melting and remolding lets you pour soap into unique molds, like fun shapes for kids or guest soaps. You can make miniature bars for travel or extra-large bars for heavy-duty cleaning. Get creative with silicone molds or upcycled containers.
Adding scents or colors – When remolding old soap, you have the chance to mix in fragrance oils, essential oils, or liquid dye. This gives the renewed bars a more pleasing scent or fun, colorful look. Popular add-ins are lemon, lavender, peppermint or oatmeal.
Sources:
https://www.instructables.com/Reforming-Soap-Scraps/
https://www.wikihow.com/Make-a-New-Bar-of-Soap-from-Used-Bars-of-Soap
Conclusion
Remolding bar soap can breathe new life into old bars that have worn down over time. By melting the soap base and adding colors, scents, and shapes, you can transform dull leftovers into fun new creations. The process is surprisingly simple – all it takes is a microwave, silicone molds, and a little creativity.
The benefits of remolding soap are plentiful. You can customize bars to your liking, reduce waste by repurposing old soap, and save money by making new bars out of soap you already have. Remolded soap also makes great gifts for family and friends. With some melting, molding, and imagination, you can DIY beautiful soaps with your choice of shape, color, and scent.
If you have leftover soap bars around your home, don’t throw them out – give soap remolding a try! Follow the simple melting and molding steps outlined above to create inventive new bath bars. With a bit of experimentation, you’ll be making professional-looking soaps fit for a spa.

