What Happens If You Put A Glass Jar On A Candle?
Putting a glass jar over a lit candle is a simple but fascinating science experiment. When a glass jar is placed over a candle, it alters the air flow to the flame, changing the combustion process. This demonstration allows you to observe firsthand how enclosing a flame impacts the availability of oxygen. It is an easy experiment that reveals interesting aspects of the chemistry behind how candles burn.
The Science Behind It
For fire to occur, three elements are required: heat, fuel, and oxygen. This is known as the fire triangle. Oxygen enables the chemical reaction of combustion, allowing flammable vapors given off by the fuel to combine with oxygen and create fire. Without oxygen, the fuel cannot burn.
When a glass jar is placed over a candle, it traps the hot gases and limits the amount of oxygen able to reach the flame. This oxygen depletion prevents the candle wax vapors from meeting oxygen and undergoing combustion. Gradually, the remaining oxygen inside the jar is used up by the flame and it goes out due to oxygen deprivation.
“Oxygen, fuel, heat – Starting with the very basics, you need to understand that in order for a fire to burn it needs three things: oxygen, fuel and heat.” (Source)
Preparing the Experiment
To prepare for this experiment, you will need the following materials:
- Glass jar
- Candle
- Plate or bowl
- Matches or lighter
Some safety precautions to take include:
- Have an adult present to light the candle
- Use caution when lighting matches/lighter
- Don’t leave a burning candle unattended
- Keep flammable materials away from the flame
- Allow candle wax to fully cool/harden before disposing
Before starting, make sure your workspace is clear and you have all necessary materials. Supervision is recommended when lighting flames to avoid potential accidents or injury (https://littlebinsforlittlehands.com/science-candle/). Follow standard safety practices for using fire.
Performing the Experiment
Performing this experiment is fairly straightforward, but there are a few key steps to follow:
Step 1: Choose a clear, wide-mouth glass jar. Make sure the opening of the jar is wider than the flame area of the candle you will be using.
Step 2: Place the candle on a sturdy, fireproof surface. Light the candle and allow it to burn for a minute or two before proceeding.
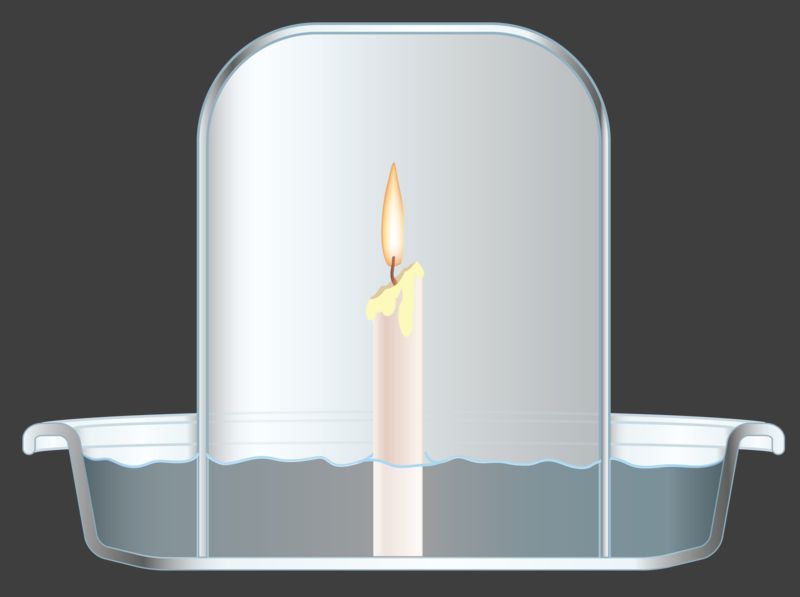
Step 3: Carefully place the glass jar mouth-down over the burning candle. Center the jar so the flame is completely covered.
Step 4: Observe what happens inside the jar. The candle flame will gradually go out after the jar is placed over it.
Step 5: Once the flame is completely extinguished, you can remove the glass jar and observe the interior. Be careful, as the jar may still be hot.
The experiment can be performed safely by taking care when handling the flame and glass jar. Make sure to place the candle and jar on a sturdy surface away from anything flammable. Have a plan to carefully extinguish the candle if needed.
Initial Observations
Right after placing the glass jar over the candle, the initial observation is that the candle continues to burn normally for a short period of time. According to research from the The Science Behind the Candle in a Jar – YouTube video, the flame will burn steadily under the jar for around 30-60 seconds before any noticeable changes occur. This is because there is still sufficient oxygen present inside the enclosed jar for the candle flame to burn and wax to vaporize. However, as the combustion reaction continues, oxygen levels start dropping rapidly while carbon dioxide and water vapor levels build up.
Within the first minute or so after covering the candle, you may notice the candle flame start to get shorter and dimmer. The bright yellow part of the flame also decreases in size. These observations indicate that oxygen levels are depleting while combustion byproducts like CO2 are increasing inside the enclosed jar. According to research from The burning candle – rising water experiment, after about 1-2 minutes the oxygen concentration has dropped low enough that the candle flame will start to flicker and go out soon.
The Candle Goes Out
As the candle burns, it consumes oxygen from the air trapped inside the glass jar. Oxygen makes up around 20% of the air, and is required for the candle wax (paraffin) to combust and release energy in the form of light and heat. The chemical reaction between the wax and oxygen is called oxidation.
Inside the sealed jar, there is only a finite supply of oxygen available. As the candle continues to burn, the oxygen levels drop steadily. Eventually there is insufficient oxygen left to sustain the chemical reaction. At this point, the candle flame will sputter and go out.
With the candle extinguished, the oxidation stops, as there is no longer enough oxygen present for the paraffin wax to react with. The candle goes out because the oxygen has been depleted by the ongoing combustion process.
What’s Left Inside
After the flame was extinguished, it was time to examine what was left inside the glass jar. Carefully removing the jar, a few key observations could be made. First, there was a thin layer of liquid water coating the inside walls and base of the jar. This water vapor had condensed from the combustion of the candle wax. There were also traces of soot and wax leftover.
In addition to the water vapor, the other main byproduct trapped in the jar was carbon dioxide. The candle relied on oxygen to sustain combustion. As the oxygen was used up, it produced carbon dioxide. With the jar sealed over the candle, the continuous buildup of carbon dioxide snuffed out the flame once enough oxygen was depleted.
The experiment clearly demonstrated that burning a candle under an enclosed glass jar leads to the production of water vapor and carbon dioxide until the oxygen supply runs out.
Trying It Again
When the candle goes out after being covered by the glass jar, the experiment is not over. An important next step is to remove the glass jar and observe what happens. According to Flame Out, the candle should be able to relight after the glass jar is taken off. This demonstrates that the candle did not actually run out of wax or wick to burn. Rather, it ran out of oxygen trapped inside the jar.
To observe this effect, carefully remove the glass jar once the candle is extinguished. Pay close attention to the wick, which should still have enough wax surrounding it. In most cases, the candle will reignite on its own after a few seconds, as fresh oxygen flows back in. The candle flame should burn just as before.
As an additional test, the glass jar can be placed over the burning candle a second time. Again, the flame will be snuffed out as the available oxygen diminishes. This process of extinguishing and relighting the candle can be repeated multiple times, until the wax or wick are fully consumed.
Other Variations
There are several variations on this experiment that can yield interesting results. For example, using jars of different sizes will impact how high the water rises. As explained on the Frugal Fun 4 Boys blog, a taller jar will allow the water to rise higher since there is more airspace for the heated air to expand into. Conversely, a wider jar will limit how high the water can rise.
Trying the experiment with multiple candles of the same size can also demonstrate the principles at work. As Harvard’s math education site notes, more candles will result in more water rising in the jar, since there is increased heating power and air expansion.
Conclusion
In summary, this experiment demonstrates several scientific principles related to heat, air pressure, and oxygen. When a burning candle is placed under an inverted glass jar filled with water, the water level inside the jar rises. This occurs because the flame heats the air inside the jar, causing it to expand. The expanded air takes up more volume, reducing air pressure inside the jar. This allows the higher pressure air outside the jar to push the water up into the available space. As the candle continues to burn, it eventually uses up all the oxygen inside the jar. When this happens, the flame is extinguished due to lack of oxygen. The main lessons learned are that heat causes gases like air to expand, expanding gases under an enclosed space reduce air pressure, and fire requires oxygen gas to burn.
This simple experiment allows us to see some complex interactions between heat, air pressure, and combustion. It demonstrates principles of physics and chemistry in an engaging hands-on way. Understanding why the water level rises as the candle burns can help build a mental model of how gases behave under different conditions of temperature and pressure. Overall, this experiment provides a fun introduction to several important scientific concepts.