How Do You Treat Tunneling In A Candle?
What is Tunneling?
Tunneling is when a cavity or hole forms in the wax of a candle as it burns (https://www.harlemcandlecompany.com/blogs/journal/candle-care-101-how-to-fix-prevent-candle-tunneling). This occurs when the wax immediately surrounding the wick melts, but the rest of the wax pool does not melt completely. Instead of the candle melting evenly across the entire top surface as it burns, tunneling causes the flame to bore down into the wax, leaving an empty space of unmelted wax around the rim. Tunneling is caused by improper cooling of the candle after it has been extinguished. When a candle is blown out, the wax immediately around the wick will re-solidify faster than the rest of the wax pool. This causes the wax close to the wick to shrink and pull away from the edges, creating a cavity. As the candle continues to burn in the future, this cavity turns into a tunnel that progresses further down through the candle. The result is an uneven burn with holes and empty spaces in the candle wax.
Identifying Tunneling
There are a few key indicators that a candle is experiencing tunneling:
- Visual indicators – You may notice a deeper melted hole or “tunnel” forming in the center of the candle while the wax around the edges remains unmelted. This tunnel shape is the most obvious sign of tunneling.
- Changes in burn time – A tunneled candle often has a significantly shorter burn time. The wick becomes too short to absorb enough wax as the tunnel deepens.
- Irregular melting – Tunneling also causes the candle to melt unpredictably and unevenly. The melted wax pools deeper in some areas than others.
If you notice any of these signs, it means your candle is likely suffering from tunneling that needs to be addressed. The faster you identify the issue, the easier it will be to take steps to fix the tunneling candle.
Causes of Tunneling
There are a few main reasons why candle tunneling occurs:
Cooling too quickly – If a candle cools too quickly, the wax around the edges solidifies before the wax in the center has a chance to melt and pool outwards. This causes the flame to continue melting a tunnel down the middle of the candle. Letting the wax pool all the way to the edges before blowing out the flame can help prevent too-rapid cooling. According to All Seasons Wax Company, cooling the candle too quickly is one of the most common causes of tunneling.
Wick issues – Using the wrong wick type or wick size for the candle diameter and wax type can lead to tunneling. If the wick is too small, the flame will be too low intensity to melt out the edges. A larger wick paired with a slower burn time is recommended to allow even melting across the entire top surface of the candle. Wicks that are off-center can also create uneven melting and tunneling.
Improper wicking – Wicks that are not centered properly in the candle can cause the flame to melt more wax on one side than the other. This uneven melting pattern can result in tunneling over time. Carefully centering the wick while the wax is still molten can help prevent tunneling issues.
Preventing Tunneling
Proper wick sizing is crucial for preventing tunneling. The wick should be wide enough to melt the wax pool evenly but not so wide that it overheats the center and causes tunneling (source). Choose a wick size appropriate for your particular wax and vessel shape. Testing different wick sizes during the development process can help optimize for an even burn.
Avoiding drafts during the cooling process will also help prevent tunneling. Allow candles to cool undisturbed, away from vents, windows, doors, or fans that can accelerate cooling of the center wax pool. Hardening the outer wax too quickly traps heat in the middle and leads to a sink hole (source).
Testing different wax formulations can minimize tunneling tendencies. Some wax blends are more prone to shrinking and pulling away from container walls as they cool. Experiment with wax ratios like paraffin, soy, coconut, or beeswax to find an optimal formula that hardens smoothly (source).
Fixing Tunneling Candles
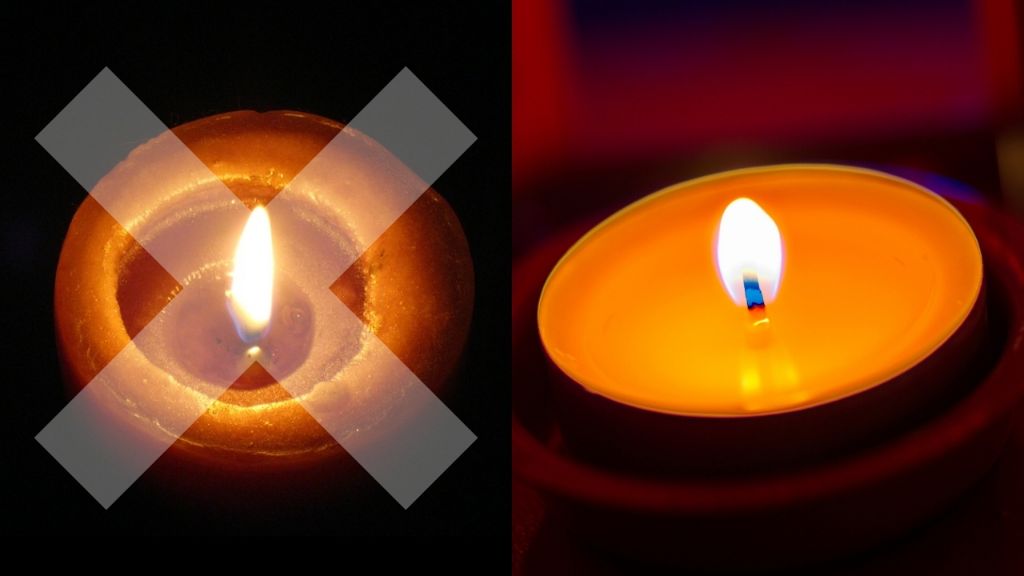
There are a few methods for fixing a candle that is tunneling:
Repouring with New Wick
One option is to fully melt the wax, pour it into a new container with a new wick, and allow it to cool and harden again evenly. This gives you a chance to use a larger wick or adjust the wax recipe. Make sure to follow proper safety precautions when melting candle wax.
Using a Heat Gun
A heat gun or hair dryer on a low setting can be used to gently re-melt the tunneled wax and blend it back with the rest of the candle surface (source). Slowly move the heat source back and forth over the tunneled area until it melts and blends smoothly. Allow to fully cool before relighting.
Wick Trimming
Trimming the wick to be slightly shorter can help reduce further tunneling. Always trim the wick to 1⁄4 inch before lighting to avoid excess smoking and uneven burning (source).
Best Wax for Reducing Tunneling
The type of wax used in candle making can impact the likelihood of tunneling. Some waxes are more prone to tunneling than others. When selecting a wax, consider the following benefits of each type:
Soy wax is often recommended for reducing tunneling. It has a lower melting point which helps the wax pool evenly as the candle burns. Soy wax also contains natural oils that anchor the wick as the wax melts. Its ability to help candles burn evenly makes soy a top choice for avoiding tunnels [1].
Paraffin wax is affordable and accessible. However, it tends to shrink more than other waxes as it cools which can lead to tunneling over time. Blended paraffin waxes perform better than pure paraffin. Adding vybar helps strengthen paraffin wax. Proper wicking is also key for tunnel prevention in paraffin candles.
Beeswax has natural flexibility that allows it to adhere well to wicks. This helps keep wicks upright as candles burn. Beeswax’s low shrinkage also helps prevent cracking that can lead to tunneling. Its natural texture provides good capillary action to maximize wax pooling [2]. Pure beeswax candles need wider wicks to accommodate the thick wax.
Wick Selection
Choosing the proper wick size is crucial for preventing tunneling. The width of the candle vessel and the type of wax used determine the ideal wick diameter. Wider jars and harder waxes require a thicker wick so that the entire pool of melted wax can be absorbed and combusted efficiently. Testing different wick sizes during the prototyping phase allows candle makers to find the optimal balance between a large enough wick to prevent tunneling yet small enough to avoid excessive sooting.
Wick positioning also affects tunneling. Centering the wick in the candle ensures even melt pools. Off-center wicks tend to create hot spots on one side, causing the wax to melt unevenly and tunnel down one side of the candle. Proper wick placement in the exact center permits symmetrical melting and burning.
Testing is key to matching the wick to wax type and vessel size. Reputable wick manufacturers provide guidelines on pairing wick sizes with common candle waxes and jar diameters. Starting with their recommendations, makers can fine-tune by producing sample candles to compare burn performance. Observing issues like tunneling, sooting, and mushrooming provides valuable data to select the optimal wick.
Cooling Process
Proper cooling is essential for avoiding tunneling in candles. There are two main methods for cooling candles:
- Room temperature cooling: Allowing the candle to cool slowly at room temperature is ideal. Place the candle in a draft-free area away from vents or windows. Let it cool undisturbed for at least 2 hours before moving it. This gradual cooling helps prevent tunneling by allowing the wax to shrink evenly.
- Accelerated cooling: If you need to accelerate cooling, you can place the candle in the refrigerator for 1-2 hours. Cover the candle with foil or plastic wrap first to prevent condensation from wetting the wick. The refrigerator should be set to around 40-50 degrees Fahrenheit. Avoid cooling the candle too quickly, as drastic temperature changes can lead to cracking or tunneling.
No matter which cooling method you use, avoid drafts around the candle as it sets. Fans, vents, open windows or doors can cause uneven cooling, leading to tunnels. For best results, cool your candle in a stable environment.
Testing for Tunneling
Test burns are an essential part of candle making to check for issues like tunneling before selling or gifting a candle. Some key steps when test burning include:
Perform test burns on each new candle fragrance or wax formulation. Light the candle and allow it to burn for at least 4 hours for containers or 2 hours for pillars. Observe how the wax pools and document any issues like tunneling, sinking, or an uneven melt pool. According to Candle Science, the ideal test burn allows the wax to melt out to the very edge of the container to maximize fragrance throw and minimize issues like tunneling.
Record detailed results of each test burn including the date, wax and fragrance formulation, vessel type, weather/environmental factors, burn time, melt pool properties, soot measurements, wax left unmelted, and other observations related to performance. Photos and video can help document the burn visually.
Based on the test results, make calculated adjustments to the wax, fragrance load, wick size, vessel dimensions, etc. Continue test burning each iteration until the optimal combination is reached. Keeping detailed records allows candle makers to pinpoint what factors create or solve tunneling.
According to Nic Candle Supplies, test burns should show no more than 1-2mm of wax adhering to the sides for optimal tunneling prevention. Excess wax residue over 3mm indicates potential tunneling. Adjust the formulation based on these test burn results.
When to Discard a Tunneled Candle
At some point, a severely tunneled candle may need to be discarded rather than attempted to be fixed. There are a few factors to consider when deciding if your tunneled candle is beyond saving:
Severity of Tunneling
If the tunnel goes all the way through the candle, leaving very thin walls, the structural integrity is compromised. Attempting to fix extreme tunneling like this could lead to the walls collapsing or the candle caving in on itself. Additionally, if the wick is mostly floating in a large tunnel void, the candle may not burn properly even if fixed.
Safety Concerns
Excessive tunneling that exposes the glass or leaves thin walls can become a fire hazard. The candle wax helps contain and control the flame. Without enough wax surrounding the wick, the risk of the glass cracking from heat exposure or the flame growing out of control increases.
Aesthetic Issues
Smaller tunnels and minor imperfections can be part of the handmade charm of candles. However, large gaping tunnels, extremely thin walls, and excessive sinkholes are unsightly. At a certain point, the aesthetic appeal is lost, and the candle looks like a defective product rather than an artisanal creation.
Proper wick size selection and allowing candles to cool between burns can help prevent severe tunneling. But if a candle is too far gone, it may be time to discard it and start fresh with a new one.


