How Do You Restore A Candle?
Check the Condition of the Candle
Before restoring an old candle, it’s important to thoroughly inspect its current condition. Look for any signs of damage, wear or issues that need to be addressed in the restoration process. Some key things to check for include:
– Broken or burnt wicks: The wick is the most integral part of a candle, so check that it is still intact and usable. Burnt, broken or missing wicks will need to be replaced.
– Melted wax: If the candle wax has melted and spilled over, those damaged sections will need to be scraped away and replaced with new wax. Try to assess how much wax might need to be added.
– Dents, cracks or holes: Candles can become dented or cracked if dropped or mishandled. Check for any deep cracks or holes that expose the wick, as these weak points will impact burning.
– Dust, dirt or debris: Over time, candle surfaces can collect dust, dirt, wax pieces or other debris. Make note of any cleaning needed to refresh the candle’s appearance.
Thoroughly inspecting the candle allows you to identify all the steps needed for restoration. This preventative check will lead to better results.
Remove the Wick
The first step is to remove the wick from the candle. Since it’s burned and damaged, it needs to be replaced with a new wick during the restoration process. Carefully clip the wick as close to the wax surface as possible using scissors or wire cutters. Any excess wick that isn’t removed can leave black soot marks on the candle when it’s burned again.
Make sure to remove all traces of the wick and any attached wick stick. A stub sticking out of the wax can prevent the candle from burning evenly when it’s relit. Make the candle surface as clean as possible before moving on to reshaping the wax.
Scrape Away Excess or Damaged Wax
Once the wick is removed, it’s time to clean up the candle’s surface. Use a knife, spoon, or spatula to gently scrape away any excess melted wax or sections that are damaged, broken, or misshapen. Focus on smoothing out drips, bumps, divots, and uneven areas to create a uniform surface. Scrape slowly and carefully to avoid gouging the remaining good wax. Remove all scraped off wax bits and pieces before moving on. The goal is to create a clean, blank canvas that you can then refine and customize as desired.
Be thorough but gentle during the scraping process. Try to conserve as much of the original wax as possible while still eliminating imperfections. This step is key to ensuring the restored candle will have an appealing finish. Take your time and do not rush. Scrape methodically until no flaws remain.
Smooth and Refine the Candle Surface
Once you’ve scraped away any excess or damaged wax, the next step is to smooth and refine the candle’s surface. This process ensures you have a clean, even base before restoring the candle.
Use a knife, spatula, or sandpaper to gently smooth away any remaining wax debris or uneven spots on the candle’s surface. Work slowly and carefully to avoid damaging the candle any further. Focus on creating a uniform surface.
You can smooth the candle by holding it upright and running a knife vertically from top to bottom. Or lay the candle on its side and use a spatula to gently scrape along the surface. For intricate candles, wrap sandpaper around a pen or dowel and sand.
Remove wax dust and debris as you work. Wipe the candle with a clean cloth between sanding or scraping to clear away any wax residue.
Continue smoothing until you have a clean, refined candle surface ready for the next stages of restoration. This careful smoothing step allows you to rebuild and reshape the candle properly.
Decorate the Candle (Optional)
At this stage, you can add decorations or embellishments to customize your candle and make it your own. Here are some ideas for decorating and enhancing your restored candle:
Add Scent: You can add a few drops of essential oils like lavender, vanilla, or lemon to give your candle a nice fragrance. Stir the oils into the melted wax before pouring into the container.
Add Dye: Liquid candle dye is available at craft stores to tint your candle wax different colors. Add just a few drops at a time and mix well to achieve your desired shade.
Add Glitter: For a sparkly candle, stir fine glitter into the melted wax before pouring. Metallic glitter provides a festive touch.
Attach Embellishments: You can glue flat embellishments like beads, shells, or stones around the base or onto the surface of the candle after it sets. Or press larger decorations gently into the wax while still warm.
Get creative with different scents, colors, and decorations! Customizing your candle makes it extra personal and fun to display.
Replace the Wick
Once you have scraped away any excess or damaged wax and smoothed out the surface of the candle, it’s time to replace the wick. Proper wick replacement is crucial for restoring the candle and enabling it to burn properly again.
Start by purchasing new wick that is made specifically for candle making. The thickness and type of wick determines the size of the flame, so choose one suitable for your candle’s width and wax type. Cotton or paper fiber wicks work best for most standard candles.
There are two main methods to insert a new wick into your candle:
1. Using a wick stick or rod: Heat the end of the wick stick with a lighter or candle flame. Press the hot wick stick into the bottom center of the candle, gradually working it deeper into the wax. Thread the new wick through the hole created by the wick stick. Pull the wick until taut and position it in the center.
2. Using glue: Apply a small dot of high-temp glue or epoxy to one end of the new wick. Press the glued wick end onto the bottom of the candle at its center. Hold for 30 seconds until set. Slowly pull the wick upward, keeping it centered as the glue adheres it to the wax.
The new wick should stand upright in the middle of the candle. Trim the excess wick above the candle with scissors to about 1⁄4 inch length. Now the candle is ready for re-melting and reshaping if needed.
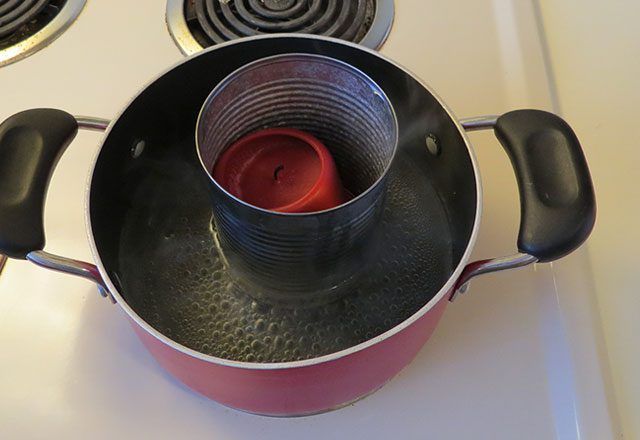
Re-melt and Reshape
Once you have prepped the candle container and replaced the wick, it’s time to re-melt and reshape the wax. The key here is to use indirect heat to gently melt the wax – direct heat can scorch or ignite the wax. To properly re-melt:
- Place the candle container with wick into a saucepan or double boiler filled with an inch or two of water.
- Heat the water to slightly above the melting point of the wax – generally between 120-170°F.
- As the wax melts, use a spoon to gently stir and reshape it into the container.
- Avoid overheating as this can discolor the wax. Keep a thermometer in the water to monitor the temperature.
- Melt until the wax is fully liquid and fills the container. Add new wax chips if needed to top up.
- Let the wax fully harden before trimming wick and lighting.
Taking the time to gently re-melt with indirect heat allows you to reuse old candle wax and restore it to its original shape and appearance.
Add New Wax if Needed
If your candle has lost a significant amount of wax and is now too small for the holder or for aesthetics, you may need to add new wax. There are a couple ways to add wax:
Pouring: If you have leftover melted wax from original candle, you can simply pour the melted wax into the holder and existing candle. Make sure the existing candle wax is melted so the new wax fully incorporates. Pour slowly and let cool fully before continuing.
Dipping: You can dip the bottom of the existing candle repeatedly into melted wax to build up wax on the exterior. Allow to fully cool and harden between dips. Rotate the candle while dipping to evenly distribute wax. Continue until candle is desired size.
When adding new wax, make sure the color and scent match the existing candle wax. Use leftover wax if possible or get more of the same type of wax. Allow any added wax to fully set before trimming wick and lighting.
Allow to Set Fully
Once your candle wax has been re-melted and shaped into the desired form, it’s important to allow it to fully set and harden before attempting to light it. Do not rush this step. The wax needs sufficient time to completely solidify and stabilize. Lighting a candle too soon can cause issues like collapsed walls, sink holes, or an uneven burn.
Set the candle aside in a draft-free area for at least 24 hours to give the wax time to fully cure. Longer is even better, like 48-72 hours. The slower the cooling process, the harder and more stable the wax will become. Quick cooling can create air pockets or weak spots in the wax that may cause problems when burning the candle.
Test the firmness by gently pressing on the wax with your finger – it should have no give and feel solid all the way through. Otherwise, let it continue curing. Avoid any drafts or rapid temperature changes during this setting period. Patience is key for the highest quality final result.
Only once the candle wax feels completely hard and rigid to the touch without any soft spots should you consider lighting it. Never rush this step or test the candle prematurely. Allowing proper time for the wax to fully stabilize is vital to ensure safe, high-quality, long-lasting results from your candle restoration.
Trim and Light Wick
Before lighting your restored candle for the first time, it is important to trim the wick to the proper length. Use sharp scissors to trim the wick to approximately 1⁄4 inch. Trimming the wick helps prevent smoking, tunneling, and an uneven flame. The wick length can be adjusted further as needed once the candle is lit. Trim the wick each time before lighting to remove any blackened bits and maintain the ideal 1⁄4 inch length.
Once trimmed, carefully light the wick with a long match or lighter. Let the wax pool and liquefy completely on the initial burn to help strengthen and adhere it. Never leave a burning candle unattended. Allow it to burn out completely each time for an even burn and wax pool. Trim the wick as needed to maintain a steady flame approximately one inch high as the candle burns down. With the wick trimmed properly before each use, your restored candle will burn clean, even and long-lasting.