How Do You Make Homemade Wax For Candles?
Making candles at home using homemade wax is a fun hobby that can provide many benefits over buying manufactured candles. Homemade candles allow you to fully control the ingredients and customize scents and colors to your liking. They also avoid unhealthy chemicals found in some store-bought paraffin candles. Using natural waxes like beeswax or soy wax produces less soot when burning and is better for the environment. The candle making process itself can have therapeutic effects by reducing stress through mindful, repetitive motions. Overall, homemade candles make great gifts and let you express your creativity.
Some key benefits of homemade candle wax include:
- Avoid harsh chemicals found in paraffin wax
- Customize scents and colors
- Use natural waxes that produce less soot
- Environmentally friendly and biodegradable
- Support small/local businesses by buying wax from them
- Make great personalized gifts
- Therapeutic hobby to reduce stress
- Express creativity through designing candles
This guide will walk through the complete process of making candles at home using homemade wax, from choosing ingredients to pouring and curing the candles.
Required Materials
Making homemade candles requires gathering some key materials before getting started. The main ingredients are wax, oils, and wicks. The three most common types of wax used are beeswax, soy wax, and paraffin wax. Beeswax produces natural, aromatic candles, soy wax is a renewable and clean-burning option, and paraffin wax is affordable and easily accessible. Essential oils are added for fragrance, while wicks draw the melted wax up as the candle burns. In addition, molds are needed to pour the wax into to set the candle’s shape, and a double boiler provides indirect heat to melt the wax at the proper temperature. A thermometer is an important tool to monitor the wax temperature during the process.
Choosing Your Wax
When making homemade candles, you have several wax options to choose from. Three of the most common types are beeswax, soy wax, and paraffin wax. Each has its own advantages and disadvantages.
Beeswax
Beeswax is a natural wax made by honey bees. Some pros of beeswax include:1
- Has a lovely natural honey aroma
- Burns brighter and longer than other waxes
- Made from a renewable resource
Some cons of beeswax are:2
- More expensive than other waxes
- Can be tricky to work with due to its high melting point
- Prone to frosting and sweating
Soy Wax
Soy wax is made from hydrogenated soybean oil. Pros of soy wax include:3
- Made from a renewable, sustainable resource
- Blended well with essential oils
- Eco-friendly and non-toxic
Cons of soy wax are:
- Doesn’t retain scent as well as other waxes
- Prone to frosting
- Can be prone to sweating in very warm environments
Paraffin Wax
Paraffin wax is a petroleum-based wax. Pros of paraffin wax:2
- Inexpensive and widely available
- Excellent scent throw
- Easy to work with and blend colors
Cons of paraffin wax are:
- Not from a renewable resource
- Can emit more soot than other waxes when burned
- Not as eco-friendly as natural waxes
Melting the Wax
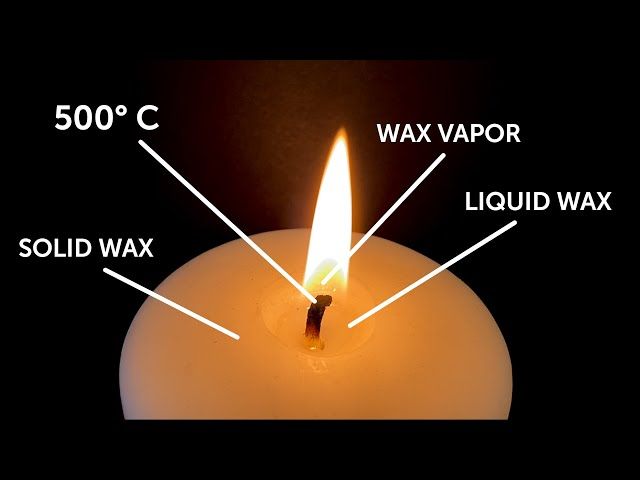
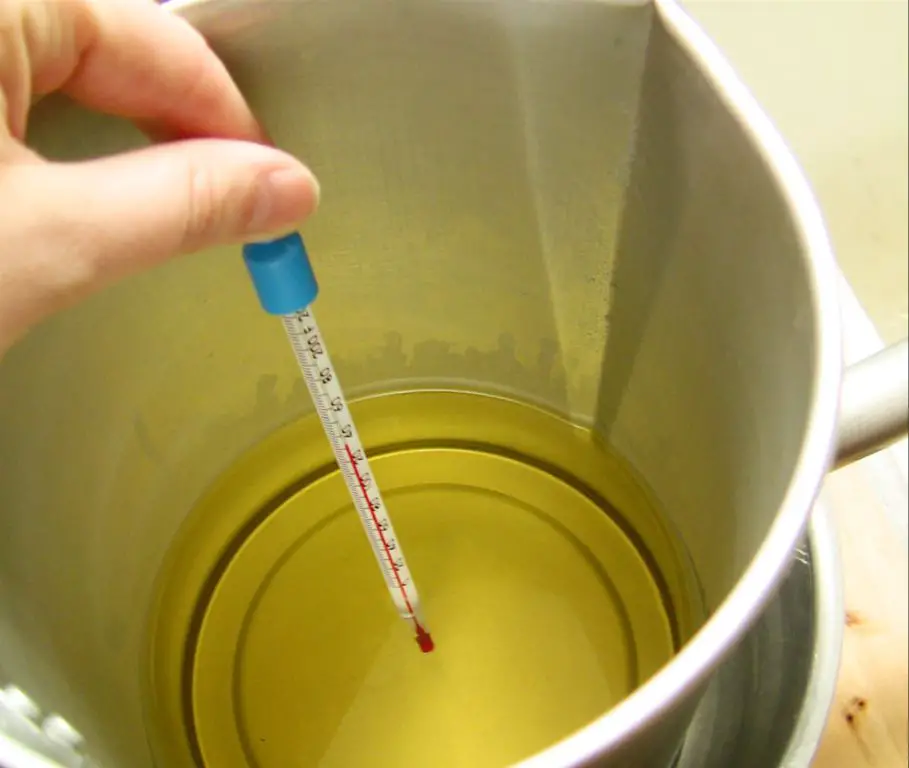
Once you have chosen your wax, the next step is to melt it down so it can be combined with other ingredients and poured into containers. The melting point of wax varies depending on the type. Beeswax has a melting point of around 144-147°F (62-64°C), while soy wax is much lower at 115-135°F (46-57°C). Paraffin wax melts around 115-150°F (46-66°C) depending on the blend.
The safest way to melt wax is using a double boiler, which gently heats the wax to the proper temperature without any risk of burning or scorching. Fill the bottom pot with a few inches of water and bring it to a simmer. Place your wax in the top pot, stirring occasionally as it melts down. Avoid overheating the wax, as this can impact the quality and performance. Monitor the temperature with a thermometer and remove from heat once fully melted.
According to Modern Forestry, soy wax in particular has such a low melting point that it can even be used as a moisturizer when applied directly to skin.
Adding Oils and Fragrances
One of the best parts of making your own candles is choosing your own scents. You have two main options for scenting wax – essential oils and fragrance oils.
Essential oils are derived from plants and flowers and provide a pure, natural scent. However, they are more expensive and fade faster than fragrance oils. Use essential oils at a rate of 1-2% of your wax weight.
Fragrance oils are synthetic or artificial scents that have been blended in a lab. They are generally more affordable and make scents stronger and last longer. Use fragrance oils at a rate of 6-10% of your wax weight. Adding too much fragrance oil can make the candle smell overpowering.
No matter which scent option you choose, add the oils after the wax has fully melted and stirred well to distribute evenly. Let the scented wax rest for a few hours before pouring to allow the fragrance to fully blend.
Source: https://www.tiktok.com/discover/paddywax-candle-bar-scents
Preparing the Wicks
Choosing the right wick is crucial for making homemade candles. The wick draws wax up through capillary action and must be properly sized for the particular wax, container, and desired burn characteristics.
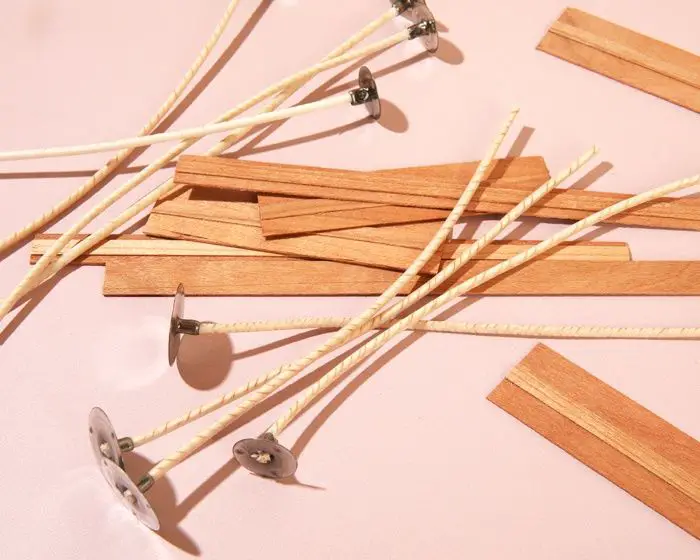
Popular wick types include cotton, paper, zinc, and wood. Cotton wicks are soft, flexible, and excellent at retaining fragrances. Paper and wood wicks create a soothing, crackling sound when lit. Zinc wicks don’t produce smoke or odor when burning.
It’s important to wick candle containers appropriately. Wide jars and containers need wider wicks so the melting wax pools properly when lit. Narrow containers require thinner wicks to avoid tunneling, poor wax pooling, or drowned wicks.
Wicks are available in different plies (strands) and diameters. Follow manufacturer guidelines on pairing wicks with wax and container types. As a general rule, use larger wicks with soy, coconut, or beeswax and smaller wicks for paraffin. Test different wicks to find the best burn for your homemade candles.
For more guidance on selecting wicks, see: Buy Wicks for Candle from Candle Lab
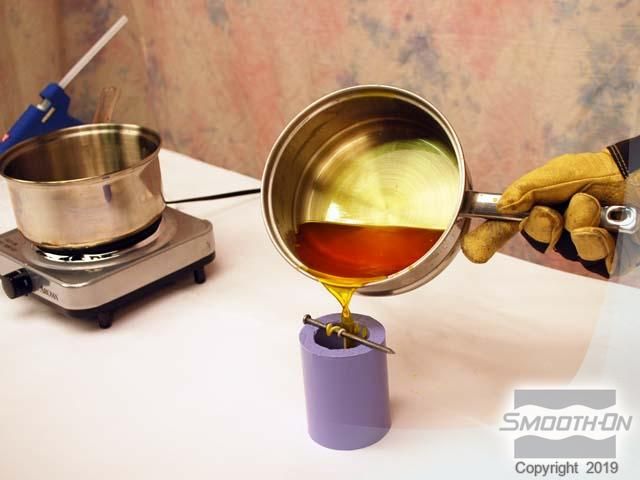
Pouring the Wax
Once the wax has fully melted and reached the proper pouring temperature of around 130-165°F (54-74°C), you are ready to pour it into molds. Make sure to stir the wax first so it is fully mixed and uniform in color and temperature. Wax that is too hot can burn and be unsafe to handle. See this article for tips on pouring wax into molds while avoiding spills or bubbles.
Choose candle molds made from silicone, glass, or metal. Plastic can stick to the wax. Make sure molds are clean and dry before pouring. Place wicks into the molds first and secure them so they remain centered. Carefully pour the wax into each mold, leaving about 1/4 inch of space at the top. This allows room for the melt pool when burning the finished candle. Let candles cool completely before removing from molds, about 6-12 hours.
Cooling and Curing
After pouring the wax into containers, it’s important to let the candles cool and cure properly before use. Cooling slowly helps prevent cracks, sinkholes, and other defects. Allow the candles to cool at room temperature for 12-24 hours. Avoid cooling the wax too quickly by putting it in the refrigerator or freezer as this can cause additional issues.
The curing process allows the wax to become denser and stabilizes the scent. Curing makes the candle burn more slowly and evenly. Homemade candles should cure for 1-2 weeks before burning to allow the fragrance to fully set. During the curing period, store the candles in a cool, dry location away from light and heat.
According to experts, “Once the candle has cured, the scent throw will be stronger and more consistent” (Source). Proper cooling and curing are vital steps that allow homemade candles to burn their best.
Troubleshooting
Even with the best practices, issues can arise when making homemade candles. Here are some common problems and how to fix them:
Wet spots or oil rings – This is caused by too high of a fragrance load. Reduce the amount of fragrance oil to 6-8% of the wax weight. Make sure to stir thoroughly and pour candles at the proper temperature (https://practicalselfreliance.com/candlemaking-beginners/).
Cracking – This happens when the candle cools too quickly. Allow the candle to cool slowly and avoid drafts. Pour candles into warmed containers and make sure your wax has a proper cooling temperature. Adding oils like coconut oil can also help prevent cracking.
Tunneling – Where the wax burns unevenly, creating a tunnel down the center. Use a bigger wick, pour at a lower temperature or add oils to make the wax more pliable. You can fix tunneled candles by pouring more wax into the hole.
Soot or black smoke – Trim the wick to 1⁄4 inch before burning and make sure the wick is not too large for the candle diameter. Only use candle-grade wicks.
Storing and Use
Properly storing your homemade candles is crucial for preserving fragrance and maximizing burn time. Always store candles in a cool, dry place away from direct sunlight and heat sources. Fluctuations in temperature can cause candles to sweat or lose their shape. Storing candles in a temperature-controlled environment between 60-80°F is ideal.
For best results, store finished candles in glass jars with tight-fitting lids. Glass prevents scent absorption and a tight seal locks in fragrance. If reusing jars, clean thoroughly to remove any residue that could impact scent. Label jars clearly with the fragrance name, color, and pour date. This helps with organization and rotation. Storing candles upside down can help prolong wick life.
Rotate stock and burn older candles first. Most homemade candles will last around 6 months if stored properly. Citrus and spice scents may lose intensity faster than other fragrances. Burn homemade candles for 1-2 hours per inch of diameter for optimal performance. Keep wicks trimmed to 1⁄4” before lighting to prevent smoking issues.
With proper storage conditions and wick maintenance, homemade candles can provide 20-40 hours of burn time. Storing homemade candles properly is simple and will help you get the most enjoyment from your candle creations.