How Do You Make Candles That Can Be Used As Body Oil?
Using candles as moisturizing body oil provides a number of benefits to the skin. The oils used to create the candles, such as coconut oil, shea butter, and sweet almond oil, can deeply hydrate, nourish, and soften skin when applied topically after melting. As the candle burns, the oils are warmed, allowing them to be readily absorbed into the skin for a soothing effect. Soy wax candles with added oils and butters create a luxurious spa-like experience when used for massage. The oils in the melted wax help to moisturize dry areas, leaving skin feeling smooth and supple. Candles made using ingredients safe for skin contact provide an aromatherapeutic and skin-loving 2-in-1 experience.
As explained in this article, “What Is A Warm Body Lotion Candle & How To Use It”, the carrier oils, butters, and essential oils melt into a lovely moisturizing oil that softens, hydrates, and rejuvenates the skin when applied after candle burning.
Choose the Right Candle Wax
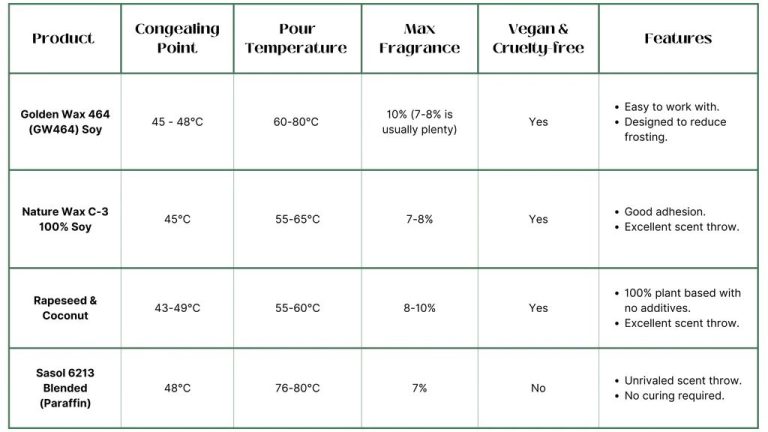
The type of wax you use is crucial for making candles that can also be used as body oil. Stay away from paraffin wax, as this is a petroleum byproduct that can be drying on skin. Instead, look for plant-based waxes that contain moisturizing oils like coconut, olive, almond, etc. Some top options include:
- Coconut Wax – Made from coconut oil, this wax moisturizes skin while providing a clean burn.
- Beeswax – Natural wax made by honey bees that is anti-inflammatory and soothing.
- Palm Wax – Derived from palm oil, this wax is hydrating and creates a smooth texture.
- Soy Wax – Made from hydrogenated soybean oil, soy wax has emollient properties to hydrate skin.
Opt for waxes labeled as “skin safe” or “cosmetic grade” to ensure purity. Stay away from dyes, as these can irritate skin. The natural color of the wax is ideal.
Add Essential Oils
Selecting the right essential oils is crucial when making candles that can also be used to moisturize the skin. When rubbed into the skin, the oils from the melted candle will provide nourishing benefits.
For dry skin, look for essential oils like lavender, chamomile, sandalwood, and clary sage. Lavender oil, in particular, has natural antibacterial and anti-inflammatory properties that can help soothe and heal dry, cracked skin [1]. Chamomile oil contains azulene, which helps reduce redness, itchiness, and irritation associated with dryness [2].
For aging skin, consider geranium, frankincense, rose, and myrrh oils. Frankincense helps protect skin cells and keeps it looking youthful, while rose oil promotes collagen production [3]. Myrrh oil has antioxidant and anti-inflammatory properties to revitalize mature skin.
No matter your skin type, opt for pure, high-quality essential oils and stick to a 2-3% concentration in your candle wax. Test a small amount on your skin first before full use.
Prepare the Wick
Choosing the proper wick is an important step in candle making. The wick is the component that carries the flame and allows the wax to melt and the fragrance to disperse. For body oil candles, it’s best to use cotton or paper wicks.
Cotton wicks are soft and flexible. They bend as the candle burns, helping maintain an even flame. Cotton also has a natural fiber braid that holds more wax. This allows the wick to curl back into the melted wax pool as it burns. Cotton wicks are excellent at releasing fragrance from the hot wax.
Paper wicks are flat and wide. They allow more wax to melt at the top, giving off more fragrance. The flat shape also promotes a larger wax pool, releasing more scent. Paper wicks burn cleaner than cotton wicks, producing less soot.
When preparing your wicks, make sure they are trimmed to 1⁄4” length to avoid black smoke. Wicks that are too long will generate excess soot. It’s also important to center each wick in the container so it burns properly.
Melt the Wax
To melt the wax properly for candle making, it’s best to use a double boiler. This allows you to heat the wax gently and evenly to reach the proper melting point. Different types of candle wax have varying melting points. Paraffin wax melts between 115-142°F (46-61°C) while beeswax melts between 144-149°F (62-65°C) (https://brookotascreations.com/which-temperature-does-candle-wax-melt-complete-list-of-waxes/). Make sure you don’t overheat the wax past its melting point as this can damage it. Use a thermometer to carefully monitor the temperature and keep the wax just above its melting point until fully liquid.
Add Fragrance
Once the wax has fully melted, you can add the fragrance oils. The amount of fragrance oil to use will depend on the type of wax. According to The Wax Chandler, for soy wax, use 6-8% fragrance oil by weight. For paraffin wax, use 10-15% fragrance oil. Be sure to stir in the oils slowly to fully incorporate them.
Stirring in the fragrance oils after the wax has melted helps the oils fully bind to the wax. According to Olii Craft, stirring the fragrance in while the wax is still in liquid form allows for an even dispersion of fragrance throughout the wax. This prevents the oils from floating to the top or settling on the bottom when the wax starts to cool and harden.
When adding fragrance, stir slowly and gently to avoid introducing too many air bubbles into the wax. Excess air bubbles can cause issues like frosting on the candles as they burn. Take care to fully incorporate the oils while minimizing disruption of the wax.
Pour into Containers
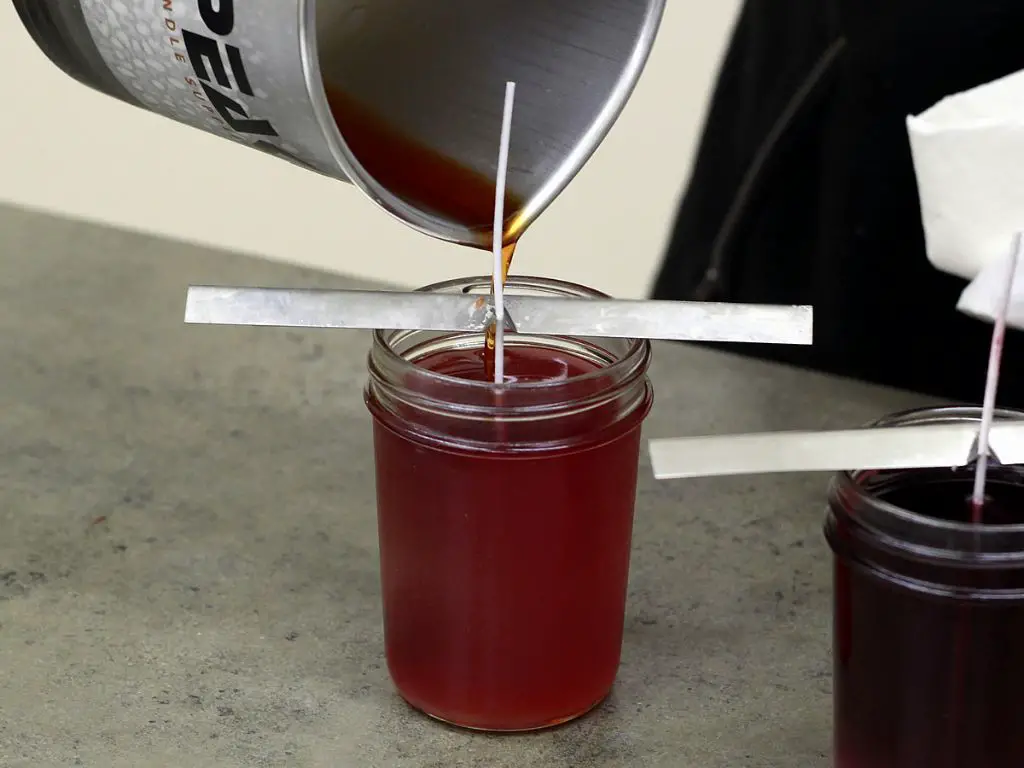
Once the wax has fully melted and you’ve stirred in any essential oils or fragrances, you’ll want to carefully pour the liquid wax into containers. Make sure your containers are heat safe and able to withstand hot wax. Glass or metal containers work best.
Pour slowly and evenly to prevent spilling and fill each container about 3/4 full, leaving room for the wick. As you pour, hold the wick in place so it remains centered.
Allow the poured candles to fully cool and harden before attempting to use them. This can take 6-12 hours or more depending on the size of the candle. Patience is important, as using a candle before it has completely cooled and set could lead to burns or other accidents. A properly hardened candle will have an opaque, smooth look when cooled.
Trim the Wick
Once the candles have fully cured, you must trim the wick to approximately 1⁄4 inch before lighting to prevent issues like tunneling. Use sharp scissors or clippers to carefully snip the wick straight across at the desired height above the wax. The National Candle Association recommends leaving no more than 1⁄4 inch of wick exposed on a container candle before burning.
Properly trimming the wick to 1⁄4 inch helps ensure even melting across the top as the candle burns. Excessive wick that is not trimmed can create a large flame that actually burns too hot. This leads to issues like pooling, where wax melts faster than it can be absorbed by the wick (according to Choosing the Correct Wick Size for Your Kerosene Burner). Keeping the wick trimmed prevents this problem.
Allow to Cure
One of the most important steps in making candles is allowing adequate time for curing before use. Curing refers to the process where the wax and fragrance oils bind together as the candle sits undisturbed after pouring. Proper curing results in an evenly burning candle that retains its scent. According to experts, you should allow candles to cure for 1-2 weeks before lighting them.
The curing timeframe can vary based on the type of wax used. Soy wax candles need 10-14 days to cure properly. Paraffin wax cures faster in 3-5 days. Beeswax and other natural wax candles require at least 1 week. Curing with the lid off helps release moisture from the wax. However, some recommend curing with the lid on to prevent losing scent (Source). Overall, erring on the side of a longer cure time guarantees better performance.
Rushing to burn a candle too soon can result in issues like poor scent throw, tunneling, and dripping. Allowing the full curing period enables thorough bonding and helps ensure your homemade candles burn evenly from edge to edge. While it takes some patience, letting candles cure for 1-2 weeks makes a significant difference in the final product. The wait will be worth it for candles that perform their best.
Use Safely
When using candle wax as body oil, it’s important to use caution and test it on a small patch of skin first. According to Is Soy Wax Safe for Skin? | San Jose California, you should do a patch test on your arm before applying the oil all over your body. Apply a small amount to your forearm and wait 24 hours to see if any irritation develops.
It’s also crucial to keep the oil away from your eyes as it could cause irritation. The fragrance oils and wax are not formulated for use on the delicate eye area. If oil gets into your eyes, flush them thoroughly with water. Discontinue use if your skin develops a rash or irritation from the body oil.
When used appropriately on unbroken skin and patch tested first, soy candle wax with skin safe fragrance oils can provide moisturizing effects. But always exercise caution and monitor your skin’s reaction closely.