How Do You Harden Soap Molds?
Soap molds are containers used to shape cold process soap after it is poured. There are several types of molds used for soapmaking including wood, silicone, plastic, and cardboard. The soap hardens inside the mold as it cures, so it’s crucial for soap molds to promote proper hardening.
Hardening is important in soapmaking because it allows the soap to be removed cleanly from the mold without damage. If soap does not harden properly, it can become misshapen, develop cracks, or become too soft. Hardened soap bars last longer in use without breaking down prematurely. Proper hardening also gives soap an appealing smooth appearance and ensures uniformity between batches.
Preparing the Soap Molds
Before pouring soap into a mold, it’s important to properly prepare the mold to ensure easy release of the finished soap. Here are some tips for getting soap molds ready for use:
Clean the molds thoroughly before first use. Wash with dish soap and hot water, then rinse and allow to fully dry. This removes any residue from manufacturing.
Lightly coat the inside of each mold cavity with a release agent. Common options are petroleum jelly, mineral oil, coconut oil, or a specialized mold release spray (Lovely Greens). This helps prevent soap from sticking.
For wooden molds, line with freezer paper shiny side up or a thin plastic bag. For silicone molds, no lining is needed but you can wipe the interior with oil for easy release.
Spray alcohol into the mold and wipe dry with a paper towel. This helps eliminate any lingering oils or residues.
Set prepared molds aside and allow to fully dry before pouring in soap batter. Properly prepping soap molds is a key step for clean, easy unmolding.
Pouring the Soap Batter
Proper pouring technique is crucial for achieving a flawless soap design. The ideal pouring temperature for cold process soap batter is between 95-100°F. If the batter is too hot, it will accelerate trace making intricate designs difficult. If too cold, the batter may seize in the mold. The viscosity of the batter also affects the pouring. Thinner batter pours more smoothly while thicker batter holds the design detail better.
To prevent air bubbles, pour the batter down the sides of the mold in a slow, thin stream no more than an inch above the mold. Tapping the mold gently on the counter can help force bubbles to the surface. If batter splashes onto the sides of the mold, use a paper towel to quickly wipe it away before it leaves marks.
For clean straight edges, pour against a spatula held against the inside of the mold. This helps prevent thin streams of batter from running down the sides. Allow each layer to setup slightly before pouring the next for crisp definition between design elements.
Sources:
https://tweakandtinker.net/4-mistakes-that-can-ruin-your-soap-design/
Removing Excess Moisture
One of the keys to preventing soap sweating is allowing the soap adequate time to dry and cure before removing it from the mold. According to https://makeyoursoap.com/prevent-soap-sweating, soap should sit in the mold for at least 24-48 hours before unmolding to allow excess moisture to evaporate. Rushing the unmolding process can trap moisture inside the soap bar leading to sweating. Patience is important.
You can also place absorbent materials like paper towels or cloth around the soap in the mold to help wick away moisture. The absorbent materials will draw out excess water from the surface of the soap through capillary action. Make sure to replace any saturated towels with dry ones to maximize moisture removal. Allowing proper cure time and using absorbent materials are two simple but effective ways to prevent excess moisture from remaining in cold process soap bars.
Improving Air Circulation
Allowing adequate airflow around soap molds during the curing process is crucial for proper hardening. According to this source, enhancing air circulation can expedite curing by maximizing evaporation. There are two main ways to improve airflow:
First, position fans near the soap to promote constant airflow over the curing bars. Fans help circulate the air and carry away excess moisture. Place the fans so they blow over the entire mold rack for maximum exposure.
Second, use a dehumidifier in the soap curing area. The dehumidifier will actively draw moisture out of the air and off the soap surface. According to soapmakers, dehumidifiers can significantly speed curing especially in humid climates.
With proper airflow from fans or dehumidifiers, soapmakers can achieve faster evaporation and curing times resulting in hardened molds that unmold cleanly.
Controlling Ambient Temperature
Proper curing of handmade soap requires controlling the ambient temperature. The ideal temperature range for curing soap is between 18-24°C (64-75°F). Temperatures below 18°C (64°F) will slow down the curing process, while temperatures above 24°C (75°F) can cause the soap to become soft or sticky during curing.
If the ambient temperature is too low, small portable heaters can be used to gently raise the temperature. Take care not to overheat the soaps. On the other hand, if the temperature is too high, small portable air conditioners or fans can help lower the temperature and improve air circulation.
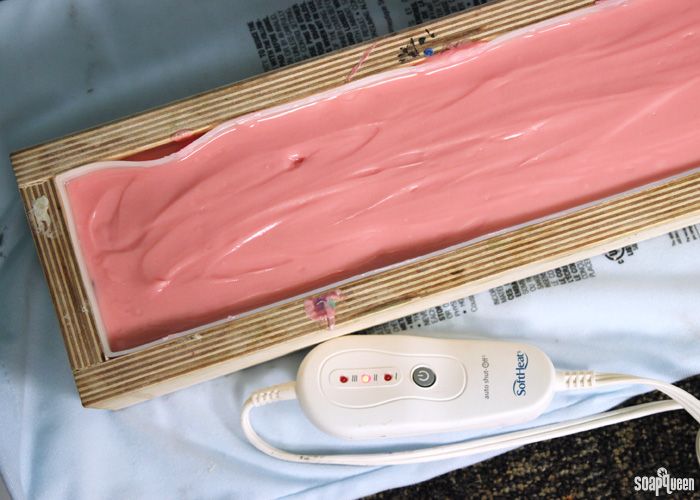
It’s important to monitor temperatures daily during curing and make adjustments as needed. The best way is to use a thermometer placed near the soaps to get an accurate reading of the ambient temperature. Maintaining an ideal 18-24°C (64-75°F) temperature will allow the soap to cure properly and develop a nice hard bar.1
Monitoring Curing Process
Monitoring the curing process is crucial to ensure the soap hardens properly. There are two key ways to track the curing progress:
1. Tracking weight loss – Weigh the soap periodically as it cures, such as daily or every few days. The soap will steadily lose moisture and become lighter as the curing proceeds. According to Soap Curing, The Secret To Making Soap In 48 Hours, the soap should lose about 30% of its weight in water during 4-6 weeks of curing. Faster weight loss indicates the soap is drying too quickly.
2. Observing visual signs of drying – Look at the surface of the soap for signs of moisture evaporating. As curing proceeds, the soap will develop a matte appearance and feel drier to the touch. Cracks, rings, or frosting on the surface are also indicators of drying. According to Cure, Cold Process Soap Properties and You! A 30-Day Experiment, the soap surface should transition from shiny to matte around 2 weeks into curing.
Storing Cured Soaps
After the soap has fully cured, which takes 4-6 weeks, proper storage is essential for maintaining the quality and integrity of the bars (https://kowalskimountain.com/how-to-store-homemade-soap/). Each individually wrapped or packaged bar should be stored in a cool, dark area with low humidity. Ideal conditions are around 55-75°F with humidity around 30-50% (https://lovelygreens.com/how-to-cure-handmade-soap/).
Wrapping bars in butcher paper, kraft paper, or wax paper helps protect them during the curing process. Once cured, they can be wrapped in cellophane, tissue paper, or placed in soap boxes. Avoid plastic wrap or bags as this can cause sweating. Proper air circulation around each bar is important to prevent moisture buildup. Placing cured bars loosely in open baskets or on shelving is recommended rather than stacking wrapped bars.
Troubleshooting Issues
Common issues that may arise during soapmaking and curing include soda ash, cracks, soft bars, and discoloration. Knowing how to prevent and fix these problems can help improve the final product.
Soda ash is a whitish powder that can form on the surface of handmade soap. It’s caused by the natural saponification process and can be prevented by maintaining a warmer room temperature during curing [1]. To remove light soda ash, gently buff it off once the soap has hardened. For heavy soda ash, try rebating the soap.
Cracks and crumbling can happen if the soap contains too much liquid or moves too much during saponification and curing. Allowing the soap to set undisturbed, using the right amount of liquid, and adding strengtheners like salt or sodium lactate can help prevent cracks [2]. If cracks do form, rebatching the soap is an option.
Soft, mushy soap is a sign of excess moisture or oils. Allowing the soap to cure longer, adding more hard oils, and keeping the curing area ventilated can create harder bars. Rebatching extremely soft soap may be necessary.
Discoloration can happen due to fragrance oils, botanicals, or oxidation. Using color stabilizers, storing soap in a cool dark place, and limiting air exposure helps minimize discoloration.
Conclusion
In summary, there are a few key steps to ensure soap hardens properly in molds:
- Prepare the molds properly by cleaning and possibly coating with a light layer of oil.
- Allow the soap batter to go through gel phase by insulating the molds.
- Unmold the soaps once they are firm enough to be removed from the molds without deforming.
- Let the soaps finish curing in a well-ventilated area for 4-6 weeks.
- Store cured soaps in a cool, dry area.
Proper curing is critical for soap quality. Allowing 4-6 weeks for a full cure enables the soap to harden completely and have a smoother texture. Fully cured soap also lasts longer in storage without losing its scent or changing color. Rushing the curing process can lead to softer, stickier soap prone to developing mold or dosing issues. Patience during the curing period results in a hard, long-lasting bar of handcrafted soap.

