How Do You Get Candle Wax To Melt Evenly?
Evenly melting candle wax is crucial for achieving optimal burn performance and fragrance throw. Uneven melting can lead to issues like tunneling, where the wax melts unevenly around the wick, causing the flame to get too close to the glass container. Other problems include weak fragrance throw if oil pockets don’t properly disperse when the wax melts. Melting the wax evenly helps ensure proper wax pool formation and wax meltage around the full diameter of the container. This allows the candle to burn slowly and safely down to the bottom without tunneling or leaving excess unmelted wax around the sides. Overall, proper pre-melting leads to better performance, safety and fragrance dispersion.
Preparing the Candle Wick
The first step to achieving an even melt pool is preparing the candle wick properly. It’s important to trim the wick to an even length before lighting to promote an even burn. Use sharp scissors to snip the wick to about 1⁄4 inch. According to the Candle Science wick guide, trimming the wick helps remove any frays or carbon buildup from previous burns. An uneven wick can lead to an uneven melt pool. Once trimmed, use the tip of the scissors to straighten out any bends or kinks in the wick before inserting it into the wax or candle vessel.
Choosing the Right Container
The container you choose to melt candle wax in is an important factor for achieving even melting. The material, shape, and size of the container all play a role.
Metal containers like stainless steel or aluminum work best. Glass can also be used with care, but avoid plastic which can melt from the heat. Metal conducts heat evenly across the entire surface in contact with the wax. This helps prevent hot spots that lead to uneven melting.
Containers with tall, vertical sides work better than wide, shallow pans. The deeper pool of wax will maintain a more consistent temperature throughout as it melts. Wide pans leave more surface area exposed to air which can cool quickly and create temperature variations.
Larger containers are also preferred over very small ones. Melting a few pounds of wax in a large pot allows the heat to distribute evenly and penetrate through the wax better. Small containers are more prone to developing hot and cold spots.
Choose a container size proportional to the amount of wax you are melting. Allow some extra room for the wax to fully liquefy and be stirred without spilling over the sides. But too large of a container with small wax volume can also inhibit even melting.
Melting Point of the Wax
The melting point of a wax refers to the temperature at which the wax transitions from a solid to a liquid state. This is an important factor in achieving even melting and distribution when making candles. Different types of waxes have different melting points based on their chemical composition.
Waxes with lower melting points, like paraffin (120-150°F) and soy (135-145°F), require less heat to liquefy than higher melt point waxes like beeswax (140-170°F) and palm (135-143°F). If the wax you are using has a broad melting range, it may begin melting unevenly at the lower end of the range and achieve a more liquid state at higher temperatures.
To promote even melting, it’s ideal to heat the wax about 10-20°F above the midpoint of its melting range. This helps the wax transition smoothly from solid to liquid without developing hot spots that lead to uneven melting. Monitoring the wax temperature and avoiding overheating is key. Refer to your specific wax type’s melt point range when selecting an appropriate temperature setting for your wax melter.
Melting the Wax
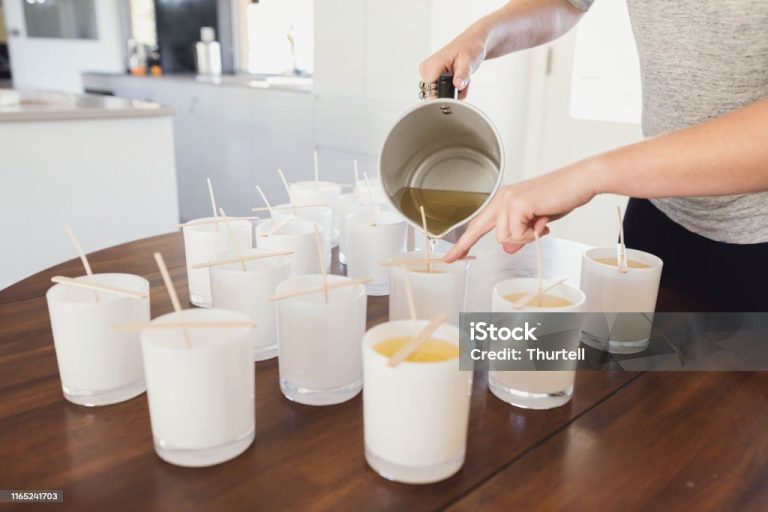
To melt candle wax evenly, make sure to heat it slowly and gently. It is better to use a double boiler or water bath to allow the heat to distribute evenly throughout the wax. Start by filling a pot with 1-2 inches of water and bringing it to a simmer. Then place your candle vessel or container with wax in the pot, making sure it does not touch the bottom. Allow the wax to melt gradually, stirring frequently with a spoon. Avoid cranking up the heat too high as this can create hot spots in the wax that lead to uneven melting. Stirring helps distribute the heat evenly. You can test to see if the wax is fully melted by touching a spoon to the bottom to ensure no solid bits remain. However, do not scrape the bottom as this can incorporate trapped water into your wax. Once fully melted, remove your candle container from the water bath and dab dry. Now the wax should be ready to add fragrance or color evenly.
According to Prosperity Candle (https://www.prosperitycandle.com/blogs/news/how-to-fix-candle-tunneling), using a hair dryer to forcibly melt the entire wax surface can also help reset the candle and promote more even melting on future burns.
Avoiding Hot Spots
One of the main causes of uneven melting is hot spots forming in the wax. This occurs when the heat is not distributed evenly, resulting in some areas of the wax melting faster than others.
To avoid hot spots when melting candle wax, it’s important to stir the wax regularly. However, avoid vigorous stirring as this can introduce air bubbles. Gentle stirring every 5-10 minutes will help distribute the heat evenly throughout the wax.
You can also maintain a low heat and melt the wax slowly. Heating the wax too quickly, especially in a microwave, often causes hot spots. Consider using a double boiler or warming tray to provide indirect, gentle heat.
Additionally, pouring wax into a warm container instead of a cold one helps prevent temperature shocks that lead to uneven melting. Pre-warming the jar by filling it with hot water is a useful technique.
As suggested in this guide, maintaining a pour temperature around 130-150°F (54-66°C) reduces the chance of hot spots developing.
Stirring and Mixing
Stirring the wax as it melts is key to achieving an even melt. You’ll want to stir frequently, especially in the beginning stages. Stirring helps distribute the heat evenly throughout the wax so that no areas get significantly hotter than others.
Use a long handled spoon or paddle to reach all areas of the melting container. Make sure to scrape the bottom and get into the corners as you stir. Stir in a consistent pattern each time rather than randomly.
When the wax first starts to melt, stir gently every 1-2 minutes. As more of the wax liquefies, you can begin stirring in wider circles to blend the melted wax with the solid pieces. Stir vigorously now to combine them.
Once most of the wax has melted, reduce stirring to every 5 minutes or so. Gently fold the wax over itself to maintain an even temperature. Avoid creating bubbles or splashing as you mix at this later stage.
Stir periodically while pouring the melted wax into containers or molds as well. This helps maintain the even melt you achieved.
Maintaining Consistent Heat
One of the keys to getting candle wax to melt evenly is maintaining a consistent heat source. Drastic fluctuations in temperature will cause some parts of the wax to melt faster than others. Here are some tips for keeping your melting setup at an even temp:
– Use a double boiler or makeshift double boiler rather than direct stovetop heat. The water bath created by a double boiler disperses the heat gently and evenly.
– Stir frequently to distribute heat throughout the wax. Don’t just let it sit.
– Keep the heat source at medium-low. High heat will make the wax melt unevenly.
– Monitor with a thermometer and adjust the heat to keep the wax within the ideal melting temperature range.
– Avoid drafts or exposing the wax to cooler air while melting.
– Insulate the melting container if needed to maintain interior temperature.
Keeping conditions steady and consistent will help the wax melt smoothly and evenly throughout.
Testing for Evenness
Once the wax has fully melted, it’s important to test that the wax has melted evenly throughout. Uneven melting can lead to problems like sinkholes, frosting, or poor scent throw in the finished candle.
A simple way to test for even melting is to insert a wood skewer, chopstick, or skinny stir stick into the wax, letting it stand upright. Observe if the wax solidifies evenly around the stick, with no gaps or voids. Slowly pull the stick out and check that no areas look darker or lighter in color.
For a more precise test, pour a small amount of melted wax onto a sheet of parchment paper or aluminum foil. Allow it to fully cool and harden, then inspect the disc of wax. It should be uniform in color and opacity throughout, with no light or dark spots (CandleScience). Break the disc into pieces to check the interior as well.
If testing reveals uneven melting, try maintaining the wax at a lower temperature or stirring more frequently while melting. Wicks that are too large for the wax volume can also cause uneven melting. Adjusting any of these factors can help achieve a more uniform melt pool.
Troubleshooting Uneven Melting
Candles that have uneven melt pools or tunneling can be annoying, but there are some easy solutions to these common issues.
If your candle has a hole in the middle of the wax (also called tunneling), try using a blow dryer to gently remelt and smooth out the top layer of wax, as recommended by Homesick. Allow the candle to cool completely before relighting. You can also put foil around the edge of the container while lighting to concentrate the flame and heat inwards, melting the edges of the tunnel.
For wax that is melting more quickly or thoroughly on one side, rotate the candle periodically while burning to distribute heat evenly, suggests Nomad Noé. Using a tool like a knife, you can also break up chunks of unmelted wax before lighting to help them melt smoothly.
Maintaining a consistent flame height will prevent uneven melting. Trim wicks as needed to 1⁄4” length before each burn. Drafts, placement, and other environmental factors can also contribute to lopsided melting, so be aware of air currents around the candle.