How Do You Fix A Candle That Tunnels In Boiling Water?
What Causes Candle Tunnelling?
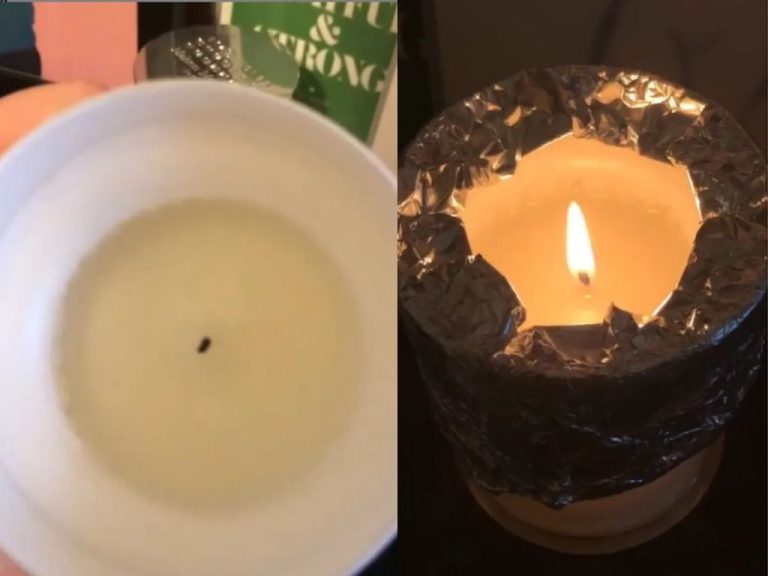
Candle tunnelling is an uneven melting of wax around the wick where a hole or tunnel forms in the wax. This tunnel goes down vertically surrounding the wick. It is usually caused by one of three things:
Improper wick size – Using a wick that is too small for the type of wax and width of the candle vessel can lead to tunnelling. A wick that is too small will not generate enough heat to melt the wax evenly. This results in the wax immediately around the wick melting faster than the rest of the candle.
Wax formulation – Soft waxes like soy, palm, and paraffin that have a low melting point are more prone to tunnelling. Beeswax and other harder waxes have a higher melting point and are less likely to tunnel.
Burning conditions – Burning the candle in a drafty area, not leaving the candle lit long enough, or leaving the candle lit for too long can all cause uneven melting and tunneling. The wax needs to liquify and pool properly around the wick to avoid tunnels.
So in summary, improper wick size, wax type, or burning habits that inhibit even wax melting can all lead to candle tunneling.
Preventing Candle Tunnelling
The best way to fix candle tunneling is to prevent it from happening in the first place. And it’s very simple, too. To prevent tunneling, all you need to do is follow some basic candle burning best practices:
First, trim the wick to 1⁄4 inch before lighting. This will help control the flame size. Too long of a wick can create a flame that is too large and hot, which melts wax too quickly and causes tunneling.
Next, make sure you are using the proper wick size for the diameter of your candle. An appropriately sized wick will burn at the right temperature for the wax pool size. Candle suppliers can recommend the right wick type and size for the candle’s dimensions.
Finally, allow the candle to burn long enough each time to form a complete melt pool across the entire top surface. This will prevent tunneling by making sure all wax is liquefied on each burn. Follow the manufacturer guidelines for proper burn times based on candle size.
Following these simple tips every time you burn a candle will help prevent uneven melting and tunneling issues.
Fixing a Tunnelled Candle
There are a few methods you can try to fix a candle that has tunneled:
First, trim the wick to 1⁄4 inch and remove any debris from inside the tunneled hole using a knife or spoon (Candle Care 101). This will allow the wick to burn properly when you relight it.
Next, fill in the tunneled hole with new wax. An easy way is to hold a wax tart or candle disc over the tunneled area and allow the wax to drip down into the hole (Prosperity Candle). Make sure the wax fully fills the hole.
Let the refilled candle cool completely before relighting, usually 1-2 hours. This allows the new wax to fully set and cure with the existing wax to burn evenly.
Once cooled and cured, you can trim the wick again and relight the candle. The key is allowing time for the new and old wax to fully integrate before burning.
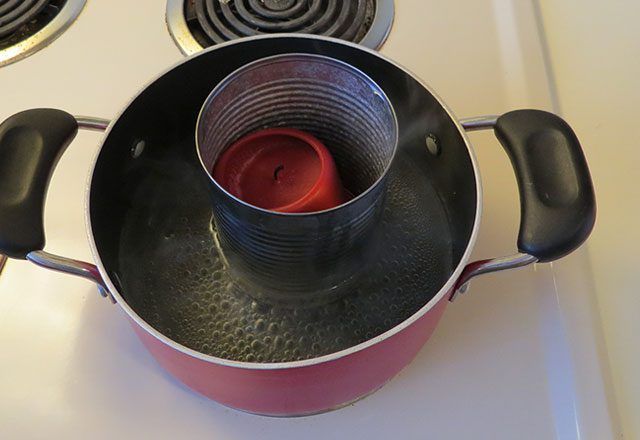
Using Boiling Water to Fix
One of the easiest methods to fix a tunneled candle is by using boiling water to re-melt the wax and fill in the hole. As the Aequill blog describes, start by bringing water to a boil in a saucepan or other heatproof container. Once boiling, remove from heat and carefully pour the hot water directly into the tunneled section of the candle. Let the candle sit for a few minutes as the hot water melts the wax back into a liquid state and fills up the hole.

After 5-10 minutes, check on the candle and pour out any excess water. Allow the wax to fully cool and re-harden, which may take up to an hour. As the wax cools, use a knife, spoon, or other utensil to gently smooth out the surface so it is even with the rest of the candle. The boiling water method is quick, easy, and effective for filling in tunneled holes and evening out the melted wax.
Pros of Boiling Water Method
One of the main benefits of using the boiling water method to fix a tunneled candle is that it helps conform the wax to the container. As the wax melts in the hot water, it becomes liquid again and is able to fill in any holes or gaps caused by tunnelling. The melted wax will coat the sides of the container evenly. This helps prevent future tunnelling issues from occurring in the same spots.
Another pro of the boiling water technique is that it’s very effective at filling in existing holes and gaps caused by tunnelling (Source). As the wax melts, it’s able to seep into any divots or tunnels that have formed. This helps level out the surface of the wax and removes the visual effect of tunnelling. The result is a smooth, even surface across the top of the candle after rehardening the wax.
Overall, the boiling water method provides an easy and effective way to reuse a tunneled candle. Melting the wax makes it malleable again, allowing it to conform to the container and fill in any problem areas.
Cons of Boiling Water Method
While using boiling water to melt and fix a tunneled candle can be effective, there are some downsides to this method that are worth considering.
One potential con is that submerging the candle in boiling water can cause more of the wax to melt than intended, beyond just smoothing out the tunneled section. This can create wax drips and mess if you aren’t careful when taking the candle out of the water (1).
The high heat of boiling water may also damage the candle’s fragrance, resulting in the candle not smelling as strong afterward. Some essential oils and fragrances can evaporate or burn off when exposed to high temperatures (2).
Additionally, the rapid temperature change of putting a candle in boiling water can cause cracking or damage to the wax itself. This is especially a concern with cheaper paraffin wax candles (3).
While the boiling water method can be a quick fix for tunneling, it does come with some potential downsides to consider. Taking care when submerging and removing the candle, and testing on cheaper candles first, can help minimize risks.
(1) https://www.reddit.com/r/lifehacks/comments/aid7hr/wicks_too_low_to_light_boil_the_candle_in_water/
(2) https://www.candlejunkies.com/guide-to-preventing-and-fixing-candle-tunneling/
(3) https://www.ifixit.com/Guide/How+to+Fix+a+Tunneling+Candle/140264
Alternative Fixes
If the boiling water method doesn’t work or you want to try a different approach, there are some other fixes you can attempt:
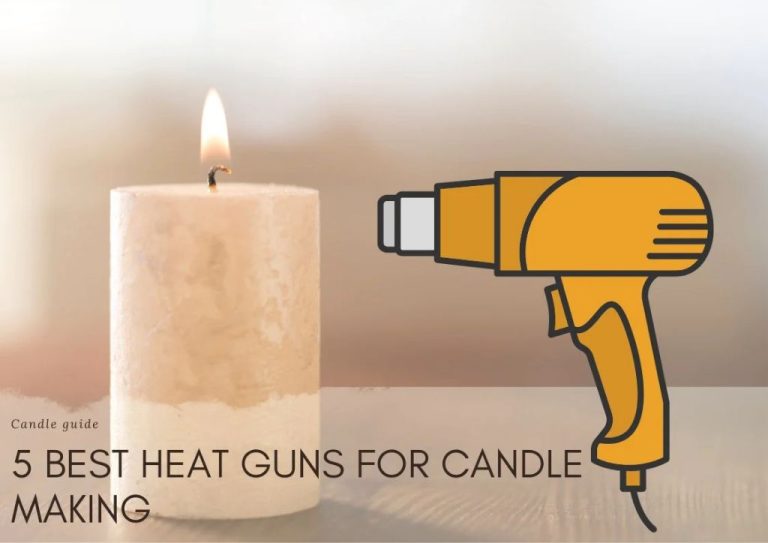
Use a heat gun to re-melt the wax around the tunneled area and smooth it out. Be very careful not to overheat the wax when using a heat gun. Keep the heat moving and don’t concentrate it in one spot (source).
Insert a new wick into the tunneled hole to provide a fresh burn channel. Make sure the wick is anchored properly at the bottom. This gives the flame a path to follow through the hole (source).
Build up thin, even layers of additional wax around the tunneled area to create a new flat surface. Allow each new layer to cool before adding the next. This essentially recreates the top of the candle (source).
Preventing Future Tunnelling
One of the best ways to prevent tunneling from happening in the future is to use proper burning techniques for your candle. Here are some tips:
Use a candle lamp or votive holder. These are designed to pool wax and provide even heating across the entire surface of the candle. The metal or glass surrounds the candle, trapping more heat and preventing uneven melting (1).
Burn the candle for at least 1 hour per inch of diameter on the first burn. This fully melts the top layer of wax and helps prevent tunneling issues on subsequent burns. Always trim the wick to 1⁄4 inch before lighting to prevent uncontrolled, rapid melting (2).
Making a few small changes to how you burn your candles can help minimize or avoid tunneling issues. With the right holder and proper burning techniques, you can enjoy your candles down to the bottom without encountering tunnels.
(1) https://tlccandleco.com/blogs/tlc-talks/what-is-candle-tunneling-and-how-do-you-prevent-it
(2) https://www.reddit.com/r/LifeProTips/comments/59w1mi/lpt_to_prevent_the_tunneling_uneven_melting_of/
When to Toss a Tunneled Candle
There comes a point when a tunneled candle is too far gone and needs to be discarded. According to Homesick1, there are three signs that indicate it’s time to toss out a tunneled candle:
- The tunnel reaches the bottom or sides of the candle. Once the tunnel penetrates through the full depth or width of wax, the candle becomes unstable and prone to caving in on itself.
- The wick can’t stand upright anymore. As the wax around the wick melts away, the wick will begin to bend and fall into the tunnel. This makes it increasingly difficult for the candle to burn properly.
- The candle keeps tunneling after each burn. If methods to fix the tunneling haven’t worked and it continues tunneling with each use, it likely means the wick is too small for the candle diameter and can’t be salvaged.
It’s not recommended to keep burning a candle once it hits these points of no return. The tunneling will only get worse, making the candle unsafe and providing poor illumination. At that point, it’s best to toss out the candle and start fresh with a new one.
Summary
In summary, candle tunnelling is caused by an improperly trimmed wick that does not burn at an even pace with the wax. This leaves a hole or tunnel in the wax. To fix a tunneled candle, methods like pouring hot or boiling water over the wax to melt and reshape it can help. However, prevention is key. Be sure to trim your candle wicks to 1⁄4 inch before each use to encourage even burning. This will help prevent tunnels from forming in the first place. Proper and routine wick trimming is the best way to avoid frustrating candle tunnels.