Can You Make A Heater With Candles?
Candles seem like a simple source of lighting, but did you know that their tiny flames can also provide usable heat? When candles burn, the chemical reaction gives off energy not just as light, but also in the form of warmth that can be harnessed. With some clever positioning and design, groups of candles can be turned into improvised heaters. This heat energy release is the same process that allows candles to melt themselves from a solid wax to a liquid as they burn. While not a replacement for a real heating system, candles can provide a surprising amount of heat when set up correctly.
Introduction
Candles seem like a simple source of lighting, but did you know that their tiny flames can also provide usable heat? When candles burn, the chemical reaction gives off energy not just as light, but also in the form of warmth that can be harnessed. With some clever positioning and design, groups of candles can be turned into improvised heaters. This heat energy release is the same process that allows candles to melt themselves from a solid wax to a liquid as they burn. While not a replacement for a real heating system, candles can provide a surprising amount of heat when set up correctly.
Warning About Fire Hazards
If you decide to make your own candle-based heater, it’s absolutely crucial to keep fire safety in mind. DIY candle heaters involve an open flame, so the risk of accidental fires is significant if not properly managed. You’ll be leaving burning candles unattended for hours, so any mistake can lead to serious consequences. The number one priority should always be avoiding fire hazards in your home.
Before constructing your candle heater, make sure you have working smoke detectors in the area. Never leave burning candles unsupervised or sleep in a room using a homemade candle-based heater. Locate your candle heater away from flammable materials like curtains, blankets or dry wood. Have a plan to extinguish the candles safely when you are done. Consider placing the heater on a non-flammable surface. Always keep a fire extinguisher and water nearby as a precaution.
While a candle heater can be an inexpensive way to provide some extra warmth, it should never compromise your safety. Weigh the risks carefully, follow all fire prevention steps, and only proceed if you are confident you can operate the heater responsibly without endangering yourself or your home.
Calculating Heat Output

To determine how many candles you need to heat a space, you’ll need to calculate the heat output in British Thermal Units (BTUs). Here’s how to do it:
First, determine the square footage of the room you want to heat. Measure the length and width and multiply them together to get the total square feet.
Next, you’ll need to know how many BTUs are required per square foot. This can vary based on factors like insulation and climate, but a general estimate is around 30 BTUs per square foot for a moderately insulated room.
Then, multiply the square footage by the BTUs per square foot. For example, a 150 square foot room would need around 150 x 30 = 4,500 BTUs to maintain a comfortable temperature.
Now determine the BTU output of the type of candles you plan to use. Most standard candles produce around 80-120 BTUs per hour when burned.
Finally, divide the total BTUs needed by the BTU output of each candle to determine the minimum number of candles needed. For a 4,500 BTU room, you would need around 45-60 candles burning at once to produce enough heat.
It’s best to round up and use even more candles than the minimum needed. But this calculation gives you a baseline to work with when creating a DIY candle heating system. Monitor the temperature and make adjustments as needed.
Capturing The Heat
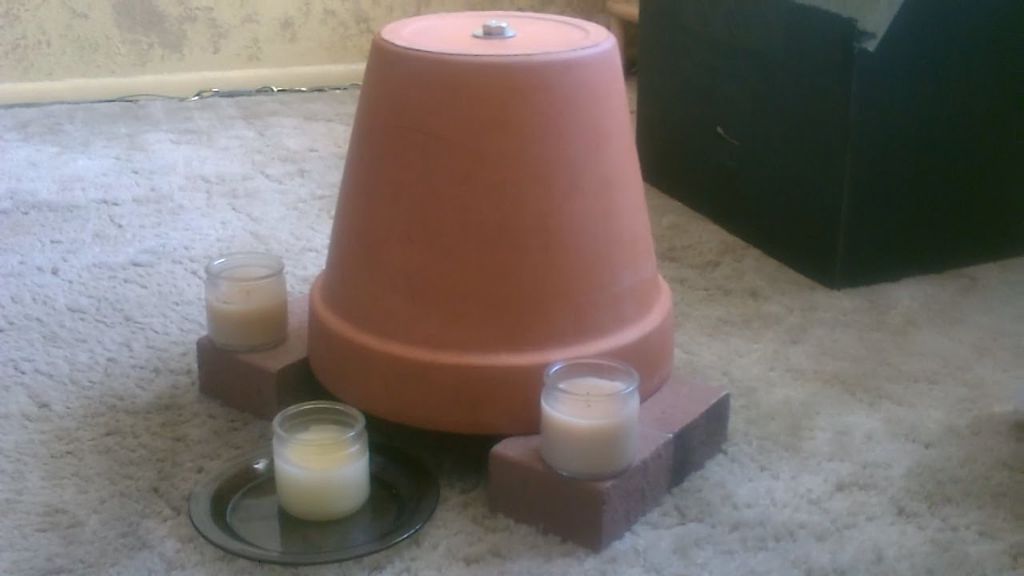
The most effective way to capture the heat from candles is by using terra cotta flower pots. Terra cotta is an excellent material for absorbing and radiating heat evenly. Turn the pot upside down and place a candle underneath the pot’s opening. The terra cotta will absorb the rising heat and radiate it into the room.
Metal containers like aluminum pans, pie tins, or even metal buckets can also be used to capture heat. Place candles underneath the metal container, allowing the heat to be captured and spread. The metal will get hot quickly and radiate heat outwards.
Other methods like surrounding candle jars with bricks, stones or sand can help prevent heat loss and focus the warmth inwards. But terracotta pots and metal containers tend to give the best results for harnessing the heat from candles.
Positioning The Candles
When using candles to generate heat, strategically positioning them can help maximize their heating efficiency. Here are some tips:
- Place candles close together near the center of the room you want to heat. The combined radiant heat from clustered candles is more effective than spacing them apart.
- Elevate candles off the floor by putting them on tables, shelves, or non-flammable stands. Heat rises, so positioning candles higher in the room helps distribute warmth.
- Avoid placing candles directly next to windows, doors, or drafts. This can pull heat away and make candles burn faster.
- For large rooms, distribute grouped candles around the space rather than only having them in one spot. This helps spread heat more evenly.
- Direct candle radiant heat in certain directions by using non-flammable reflectors or shields behind them.
- Be mindful of ceiling height. Heat from candles works best in rooms with standard 8-10 foot ceilings. Excessively tall ceilings can make it hard for candle heat to lower temperatures.
With some strategic testing and positioning, candles can be an efficient DIY heating source. But always take safety precautions and never leave burning candles unattended.
Choosing Candle Types
When selecting candles to use for a DIY heater, the type of candle can significantly impact heat output. Smaller tealights and votives produce less heat than larger pillar or jar candles. Here’s a quick comparison of some common candle varieties:
Tealights – These tiny candles in metal cups burn for 2-4 hours and put out 10-15 BTUs of heat energy. They are affordable and easy to position, but don’t generate much warmth.
Votives – Slightly taller than tealights, votive candles in glass containers burn for up to 10 hours and emit around 25 BTUs. More heat than tealights, but still on the smaller side.
Jars – Jar candles come in a wide variety of sizes, but generally burn for 20-40 hours and produce 50-80 BTUs of heat. Their flat bottoms make them easy to arrange, and the glass jars contain melting wax.
Pillars – Tall, thick pillar candles burn for up to 80 hours and give off 90-150 BTUs. They don’t require containers, but need to be secured firmly. The most heat output per candle.
For a DIY candle heater, larger pillar and jar candles provide the most warming power. Arrange them tightly and use reflectors to maximize heat production. However, smaller candles can supplement in a pinch.
Using Reflectors
Reflectors can be an effective way to direct more heat from candles into a space. Reflectors work by bouncing the infrared radiation emitted by the candles back into the room. Infrared radiation is responsible for the warming sensation we feel from heat sources like candles, fireplaces, and the sun.
You can make simple reflectors by placing candles near mirrors, polished metal surfaces, or foil. The smooth reflective surface will throw more of the candle’s infrared radiation back into the room rather than letting it escape the space. Position the reflectors behind and/or above the candles to aim more of the warmth where you want it.
Ceramic tiles also make effective reflectors. Place candles on a heat-safe ceramic tile surface to throw warmth upwards. Or stand candles next to ceramic tiles placed vertically to reflect heat sideways across a space. Just be sure to keep an eye on the tiles since they can get hot.
Experiment with arranging multiple reflectors around the candles to maximize heat radiation into the room. But take safety precautions and never leave the candles unattended since the increased heat could pose a fire hazard.
Safety Tips
Using candles to heat a space does come with safety concerns that need to be addressed. Here are some tips to keep in mind:
Never leave burning candles unattended. Make sure to extinguish candles before leaving the room or going to sleep.
Keep burning candles well away from anything flammable such as curtains, bedding, paper, etc. Leave at least 1 foot of space all around.
Place candles on a sturdy, non-flammable surface. Avoid surfaces like wood or plastic which could catch fire.
Have a fire extinguisher and smoke detectors in the room when burning candles. Know how to use the extinguisher properly.
Do not burn candles near open windows where drafts could blow the flame out of control.
Trim wicks to 1⁄4 inch before lighting to avoid smoking and excessively large flames.
Consider using battery-operated flameless candles. While not as decorative, they eliminate the fire risk.
Never leave pets or small children unattended in a room with lit candles.
Make sure to extinguish all candles before going to bed. Consider blowing them out if you fall asleep unexpectedly.
Inspect the candles occasionally as they burn for signs the container or wick is getting dangerously hot.
Maintaining The Candles
To get the most heat and burn time from your candles, you’ll need to maintain them properly. Here are some tips:
Trim the wicks – Use scissors or nail clippers to trim wicks to 1⁄4 inch before lighting. Long wicks create excess smoke and uneven burning.
Avoid drafts – Shield candles from drafts which can disrupt the flame. Consider placing a wind barrier around the candles if needed.
Use a candle lamp – Placing candles in glass containers helps protect the flame from drafts. Candle lamps also catch dripping wax.
Rotate candles – For even burning, rotate pillar candles a quarter turn after an inch burns.
Clean jars – Remove wax build-up on jar edges for better scent throw.
Allow to cool – Let candles cool completely before relighting or moving them.
Conclusion
In summary, while it is possible to produce some heat using candles, there are significant fire hazards involved. Candles should always be used cautiously, with proper supervision and adequate safety precautions in place. The amount of heat produced is limited, and candles are not an effective substitute for standard home heating systems. This article has covered some tips for maximizing candle heat output, such as using large, long-burning candles, arranging them to focus the heat, and adding reflectors. However, fire safety must be the top priority. Never leave burning candles unattended, keep them away from flammable materials, avoid drafts, maintain adequate ventilation, and have fire extinguishers and smoke detectors on hand. While a few candles can provide a small amount of supplemental heat, they do not make an adequate primary heat source. Conventional heating systems are far safer and more reliable.


