Can You Can 4 Oz Jars?
Canning is a method of preserving food by processing it and sealing it in airtight containers, typically glass mason jars. The heat used during the canning process kills any bacteria or microorganisms present, preventing spoilage. This allows the canned food to be shelf-stable and safe to eat for 1-2 years or longer. The purpose of this article is to provide information on canning, specifically addressing the question of whether 4 oz glass jars can be used for canning.
What is Canning?
Canning is a method of preserving food by processing prepared food into sealed containers, usually glass jars, and then heating them to a specific temperature in order to destroy microorganisms that could cause spoilage (HGIC). The heating and sealing process essentially sterilizes the food and the jar, creating an airtight seal that prevents recontamination.
The origins of modern canning date back to the late 18th century in France, when Napoleon Bonaparte offered a cash prize for a new method of food preservation to feed his army. Nicolas Appert devised the process of sealing food in glass jars, corking them, and then boiling the jars in water. This became the basis for modern canning (WVU).
Today, canning remains a popular method for preserving foods at home. It allows people to enjoy locally-grown produce and favorite recipes year-round.
Why Can Foods?
Canning food for preservation has many benefits. Some key benefits include:
Canning extends shelf life – Properly canned foods can be stored for 1-5 years or longer, allowing you to preserve foods when they are in season or available at peak quality. This helps provide nutritious foods year-round. [1]
Retains nutrients – The canning process uses high heat to kill bacteria but is fast acting, which helps retain many of the original nutrients like vitamins and minerals. Canned produce can be nutritionally comparable to frozen and fresh. [2]
Saves money – Canning surplus or seasonal produce allows you to buy in bulk when prices are low. Canned homemade foods also cost less than store-bought versions. [3]
Customized flavors – Canning allows you to control ingredients like salt, sugar, and spices to suit your taste.
Food security – Having a pantry stocked with canned goods provides food security and preparedness in case of emergencies or shortages.
Sense of self-reliance – Canning your own food gives a sense of satisfaction and self-reliance.
Equipment Needed
Canning requires some basic equipment to get started. Here is the essential equipment you’ll need:
- Jars – Mason/Kerr jars are recommended. You’ll need jars specifically designed for canning to withstand the heat and pressure. Wide mouth quart jars are good for beginners.
- Lids and bands – Use new lids each time you can. The bands can be reused if they are still in good condition.
- Canner – You’ll need either a water bath canner for high acid foods like fruits, or a pressure canner for low acid foods like vegetables and meats.
- Jar lifter – Allows you to safely move hot jars in and out of the canner.
- Bubble remover or plastic knife – Removes air bubbles from jars before processing.
- Kitchen tools – Can opener, ladle, wide mouth funnel, kitchen towels, etc.
Some optional but helpful items include a jar rack, magnetic lid lifter, and wide mouth funnel. Refer to this guide for a more extensive list of recommended canning supplies for beginners.
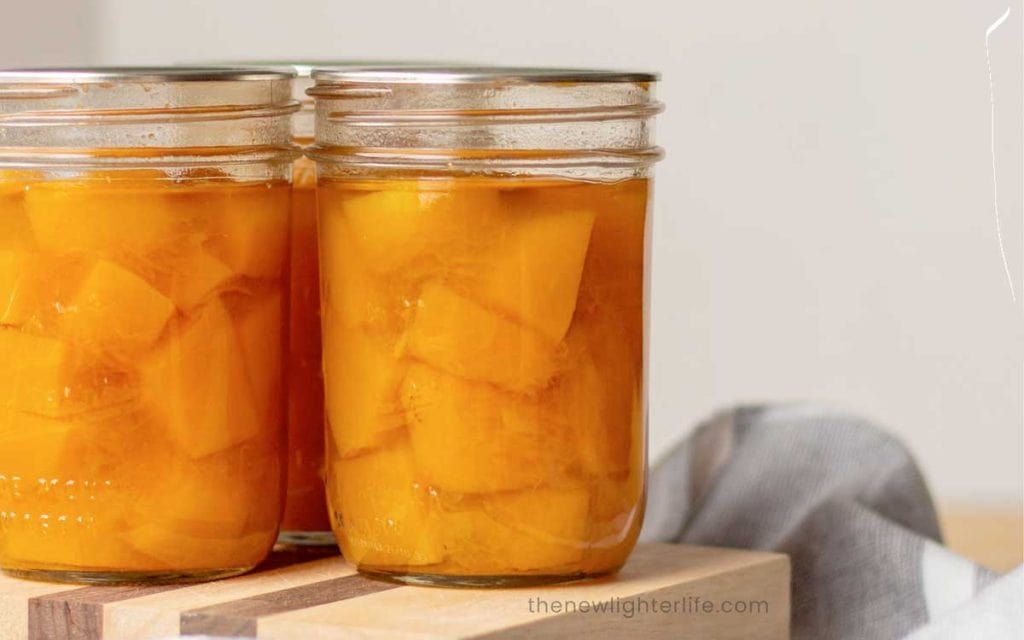
4 oz Jars
4 oz jars, as the name suggests, refer to canning jars that are 4 ounces in volume. These small jars are very popular for canning jams, jellies, sauces, and condiments in small batches or as gifts. Some key benefits and uses of 4 oz jars include:
Portion Control: The small size is perfect for single servings. This allows you to open just what you need at a time without wasting food. It’s great for canning items you may not use quickly like hot sauces or savory jams.
Gifting: The 4 oz jars make for adorable food gifts. You can create custom flavors and pair the jars with cute labels, ribbons, or other packaging. They are easy to mail or take to parties.
Trying New Recipes: The small batches are ideal for experimenting with new canning recipes before committing to larger jars. You can test recipes and tweak flavors in small amounts.
Saving Money: Using 4 oz jars allows you to buy ingredients in bulk and preserve portions you’ll actually use. This reduces food waste and saves money compared to buying small commercial versions.
Quick Meals: Canned items like salsas, sauces, and dressings in 4 oz jars can make it easy to liven up meals on busy nights. Just open one small jar and you have an instant flavor boost.
Steps for Canning
Canning involves multiple steps to safely preserve foods. According to the Step-by-Step Guide to Canning from Midwest Living, the basic process includes:
- Sterilizing canning equipment like jars, lids, and rings.
- Filling the canner with 2-3 inches of hot water.
- Loading sealed jars into the canner.
- Ensuring the water covers the jars by 1-2 inches.
- Processing the jars by bringing the water to a boil and boiling for the recommended time.
- Allowing the canner to cool and depressurize if using a pressure canner.
- Removing the jars and checking the seals.
- Storing properly sealed jars in a cool, dark place.
Following the proper canning steps destroys potentially harmful microorganisms and creates a vacuum seal for long-term food preservation, according to Clemson University.
Processing Times
When canning in a boiling water bath, more processing time is required for 4 oz jars compared to larger jar sizes. According to the National Center for Home Food Preservation, 4 oz jars require 10 minutes of processing time in a boiling water canner when canning high-acid foods like fruit, pickles, sauerkraut, jams, jellies, marmalades, and fruit butters. For low-acid foods like vegetables, meats, poultry and seafood, pressure canning is required.
For pressure canning 4 oz jars, processing times can vary based on the specific food being canned. According to the University of Minnesota extension, 4 oz jars generally require the following pressure canning times:
- Low-acid foods like vegetables, meats, poultry and seafood: 20 minutes at 11 lbs pressure (dial gauge) or 10 lbs pressure (weighted gauge)
- Soups, stews and chilies: 60 minutes at 11 lbs pressure (dial gauge) or 10 lbs pressure (weighted gauge)
It’s important to always follow validated recipes and guidelines from trusted sources like the USDA and University Extension services when determining the proper processing times for home canning. Processing time varies by food type, jar size, canning method and altitude.
Sources:
https://nchfp.uga.edu/how/general/selecting_correct_process_time.html
https://extension.umn.edu/preserving-and-preparing/canning-quick-reference-chart
Altitude Adjustments
When canning in higher altitudes of 1,000 feet or more above sea level, it’s important to make adjustments to the canning process. This is because the boiling point of water decreases as elevation increases due to the lower air pressure at higher altitudes. As a result, canned foods may be under-processed at high altitudes if adjustments aren’t made, leading to a risk of spoilage or foodborne illness.
For canning in a boiling water bath, the processing time needs to be increased by 5, 10, or 15 minutes depending on the specific altitude. At altitudes of 1,001-3,000 feet, add 5 minutes. From 3,001-6,000 feet, add 10 minutes. And from 6,001-8,000 feet, add 15 minutes. Over 8,000 feet, it’s not recommended to use the boiling water bath method.
For pressure canning, the targeted pressure needs to be increased as elevation rises. Typically, each additional 2,000 feet in elevation requires raising the pressure by 1 psi. For example, if the recommended pressure is 11 psi at sea level, at 2,000 feet it would need to be 12 psi, at 4,000 feet 13 psi, and so on. It’s critical to use the correct psi for an altitude to ensure safe processing.
Safety Tips
When canning foods at home, it’s important to follow proper safety guidelines to prevent the risk of botulism or other foodborne illnesses. Here are some key tips:
Use up-to-date, tested recipes and procedures from reliable sources like the USDA, University Extension offices, or Ball/Kerr. Older recipes may be unsafe. Check the USDA’s Complete Guide to Home Canning for current guidelines.
Carefully follow processing times and methods. For low-acid foods like meats and vegetables, use a pressure canner and process for the full recommended time adjusted for your altitude. Botulism spores can survive boiling water temperatures.
Use the right equipment. A pressure canner is crucial for low-acid foods. Only use jars designed specifically for canning. Check for cracks or defects. Use new, properly fitting lids.
Acidify tomatoes and other foods when required. For certain products like tomatoes, adding lemon juice or citric acid is critical for safety.
Allow for headspace as directed. Too little can prevent a proper seal. Too much can affect heating and create spoilage risks.
Clean all equipment and jars properly before use. Wash in hot, soapy water and rinse well. Sterilize jars by boiling before filling.
Always let products process fully before removing jars. Do not stop the canner before the processing time is complete.
Test seals and inspect jars before storing. Lids should be concave and not move when pressed. Check for any signs of spoilage before eating.
Handle jars safely to prevent breaks. Avoid temperature extremes or bumps that could compromise seals and cause spoilage.
Label jars with contents and dates. Store in a cool, dark place. Eat within 1 year for best quality.
Storing Canned Foods
Proper storage of canned foods is important to maximize shelf life and safety. Here are some key guidelines for storing canned goods:
Store cans in a cool, clean, dark, and dry place. Temperatures between 50-70°F are ideal. Avoid storing cans above 95°F as higher temperatures can shorten shelf life (1).
Label jars with contents and date canned. This allows you to rotate stock and use older cans first (2).
Store cans without rust, bulging tops/bottoms, or dents. Discard any cans that are compromised or leaking.
Most home canned foods last 12-18 months. Consume canned goods within this timeframe for best quality and safety (3).
Wipe lid rims clean before opening canned goods. Check that seal pops when opened.
Once opened, store leftover canned foods in airtight containers in the refrigerator. Use opened cans within 3-5 days.
Follow the above storage guidelines to maximize shelf life and safety of your home canned foods.