Can Essence Be Used In Candle Making?
Essential oils can add wonderful aromatherapy benefits to homemade candles. The fragrance from essential oils comes from the natural aromatic compounds within plants, unlike synthetic fragrances which are created in a lab. When pure essential oils are used, candles give off a more authentic and complex scent. The aroma is also thought to provide various therapeutic effects that can help create a calming or energizing environment.
Essential oil candles are a great way to fill your home with lovely scents from nature. You can create custom blends that set the desired mood or evoke specific emotions. The natural fragrance promotes wellbeing and can help relieve stress. Simply lighting a candle with your favorite essential oil before relaxation or meditation can enhance the experience. Overall, homemade candles with essential oils allow you to enjoy aromatherapy benefits in a beautiful and convenient way.
Selecting Essential Oils
The most common essential oils used in candle making include lavender, eucalyptus, lemon, peppermint, tea tree, sweet orange, rosemary, frankincense, grapefruit, jasmine, lemongrass and lime. When selecting oils, you’ll want to consider the strength of the aroma and safety precautions.
Citrus oils like lemon, grapefruit, orange and lime have fresh, uplifting scents that are popular in candles. However, they are more volatile and can fade quickly when burned. Eucalyptus, lavender, peppermint and tea tree have strong aromas that will hold up better to the heating process. Start with a smaller amount of these oils in your recipe.
Always check safety warnings for each oil, as some like wintergreen are not recommended for burning. Do not use any oils that are unsafe or contain phototoxic properties. Dilute stronger scented oils with lighter ones like lavender. Testing different oil blends and loads will allow you to find the right balance for aroma strength.
Essential Oil Fragrance Load
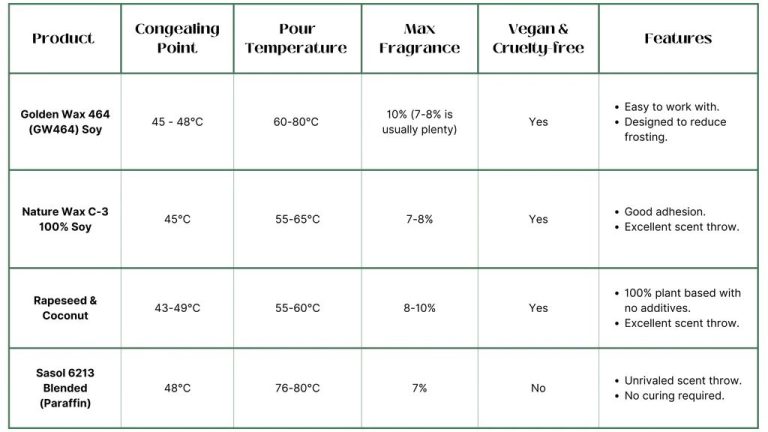
When adding essential oils to candles, it’s important to use the right amount to achieve a nice scent without compromising safety. The general recommendation is to use between 1-3% essential oil per pound of wax. This ensures the oils are dispersed properly and don’t clog the wick during burning.
For lighter scents, start with 1% essential oil. For stronger aroma, you can go up to 3% maximum. Exceeding 3% does not make the scent much stronger and can make it harder for the wick to burn properly. The flashpoint of the essential oils also needs to be considered. Some oils like citrus have lower flashpoints, so a maximum of 1.5-2% is recommended for those.
Testing different oil percentages between batches is wise to find the ideal balance of scent throw and safety with a particular oil or blend. The scent will smell stronger when oils are added versus when burning, so resist going over 3% even if the cold scent seems light. As a general rule, if an oil blend smells very strong before pouring, that is an indicator to reduce the percentage.
Finding the optimal balance takes testing, but using essential oils within the recommended 1-3% per pound of wax is a good starting point. This provides enough fragrance for candles while maintaining safe practices.
Adding Essential Oils to Wax
When adding essential oils to candle wax, it’s important to mix them in properly to ensure an even fragrance distribution. There are a couple methods you can use:
- Stirring – Once your wax has cooled to around 185-190°F, you can stir in the essential oils by hand. Use a spoon or spatula to gently fold the oils into the melted wax until well blended.
- Blending – For larger batches, you may want to use a blender or mixer on low speed to incorporate the oils into the wax. This will quickly and evenly distribute the fragrance.
The ideal wax temperature for adding essential oils is 185-190°F. This ensures the wax is cool enough not to evaporate the oils, but still warm enough to properly mix together. If the wax drops below 185°F, gently rewarm it before adding the essential oils.
Thoroughly stir or blend the oils into the wax for 1-2 minutes. You want to ensure they are fully incorporated so you don’t get pockets of fragrance that lead to an uneven scent throw. Once mixed, you’re ready to pour the wax into containers and make your scented candles!
Wick Selection
Selecting the proper wick is critical for an essential oil candle to burn cleanly and safely. The wick must be wide enough to absorb the essential oil fragrance load, while not being overly thick and smoky.
For lighter fragrance loads around 5%, a thinner wick like CD-5 is often ideal. The wick should mushroom nicely as the wax pool forms. As the fragrance load increases to 8-10%, a thicker wick like CD-7 may be required for a full melt pool without drowning the wick.
Cotton wicks are generally recommended over other materials like paper or zinc. Cotton provides a clean, even burn and helps absorb and vaporize essential oils efficiently. Paper and zinc can create more soot. Some soy wax blends specifically call for cotton core or cotton braided wicks to pair with the wax formulation.
Testing wicks is the best way to ensure you have the proper width and material. Preparing sample votive candles with different wicks will show how each performs with your specific wax, fragrance load, and jar type.
Jar Selection
When making candles with essential oils, the type of jar you select can impact the scent throw and burning experience. Here are some key factors to consider when choosing jars for essential oil candles:
Glass vs. Metal
Glass jars allow for a stronger scent throw than metal tins. The smooth glass surface helps propel fragrance up and out of the candle. Metal tins can absorb some of the aroma. However, tins have benefits too – they travel well for gifts or outdoor use.
Size and Shape
Narrow jars concentrate fragrance while wide jars disperse it. Vessels with straight sides spread scent the most evenly. Consider a wide mouth jar to experience fragrance as the candle burns down. Tall, slim jars provide a statuesque look and strong vertical scent throw when placed on tables or mantles.
Match the jar size to the essential oil candle’s burn time. Allow 1/2 to 1 inch of headspace for the melted wax while burning. Consider different shapes for variety – cylinders, rounds, squares, hexagons, etc.
Burning and Curing for Stronger Essential Oil Scent
Unlike standard candles, essential oil candles benefit from a thorough curing process to allow the scent of the oils to fully release. This also helps avoid tunneling issues that reduce candle burn time.
When first lighting an essential oil candle, allow it to burn for 1-2 hours before blowing it out. This melts the top layer of wax so the wick is centered as the candle burns down. Trim the wick to 1/4 inch before relighting.
Let the candle cure for 2 weeks before burning again. This allows the essential oil scent to strengthen as it interacts with the wax. Test the scent throw after 1 week by walking to the opposite side of the room.
Fully cured essential oil candles will have an even wax pool when lit, better scent dispersion, and burn times lasting 20-40 hours. Always keep wicks trimmed to 1/4 inch for best results.
Safety Tips
When burning any candle, it’s important to follow basic safety precautions. This is especially true for essential oil candles, as the oils can produce more soot and smoke than regular candles.
Always make sure to burn essential oil candles in a well-ventilated area. Open windows or run a fan to allow fresh airflow and prevent buildup of smoke and particulates. Never leave a burning candle unattended – stay nearby to monitor the flame and extinguish it if needed. Trim wicks to 1⁄4” before lighting to prevent excess soot. Allow the wax pool to fully melt across the top before extinguishing the flame.
Take care not to overload your candles with oils, as very high concentrations can lead to an increased risk of combustion. Adhere to recommended safe usage rates, and avoid using oils that are known sensitisers like cinnamon. Place candles on a stable, heatproof surface at least 12 inches from any combustible materials. Extinguish candles before the last 1⁄2 inch of wax to prevent breakage and wax pool overflow.
By following these simple precautions, you can safely enjoy the wonderful ambience created by essential oil candles!
Storing Essential Oil Candles
Proper storage is important for preserving your essential oil candles and extending their shelf life. Ideal storage conditions include:
- Store in a cool, dry place away from direct light and heat sources. Temperature should remain relatively constant, around 60-75°F.
- Avoid storage areas that may experience big temperature swings like attics or near appliances that give off heat.
- Keep candles in air-tight containers to prevent dust and debris build up on the wax surface.
- Glass jars with tight-fitting lids work very well for storage.
- Lay candles horizontally if stored for more than a few weeks to keep the wick centered and prevent wax pool deformities.
- Do not refrigerate or freeze candles. This can cause condensation issues and lead to frosting or blooming on the wax surface.
- Store away from direct sunlight to prevent fading of candle dyes or discoloration of the wax.
- Avoid areas with high humidity. Excess moisture can encourage mold growth on natural waxes.
With proper storage conditions, most essential oil candles have a shelf life of 1-2 years. Citrus and floral scented candles may fade more quickly, within 6-12 months. Always inspect candles before burning and discard any with apparent deformities, frosting, or mold growth.
Popular Essential Oil Blends
When creating essential oil candles, using a blend of oils can provide a more complex and intriguing fragrance. Here are some popular essential oil blend ideas to try:
Lavender-Eucalyptus: This blend combines the relaxing floral aroma of lavender with the cooling, invigorating scent of eucalyptus. It’s perfect for soothing stress or congestion.
Citrus-Herbal: For an energizing candle, blend citrus oils like lemon, grapefruit or orange with herbal oils like rosemary, basil or peppermint. The citrus provides a bright, uplifting note while the herbs add an earthy nuance.
Floral-Woodsy: Mix a floral like geranium or ylang ylang with a woodsy oil like cedarwood or sandalwood for a rich, complex fragrance. The florals offer a sweet, delicate bouquet while the woods provide an anchoring base note.
Fruity-Spicy: Combining fruity oils like mandarin, apple or pear with spicy oils like cinnamon, clove or black pepper results in a warm, exotic aroma. The fruits lend a sweet juiciness while the spices add intrigue.
Feel free to experiment with your own essential oil blends! Keep testing different oil combinations until you find your own signature scent.

